

Nextjs loading UI is the difference between an app that feels broken and one that feels instant, even when the data underneath is still loading.
In real-world full-stack applications, data fetching takes time. Servers query databases, third-party APIs process requests, and network latency happens whether you plan for it or not. A naive approach renders a completely blank screen or one giant page spinner while everything loads. That frustrates users and makes a fast backend feel sluggish.
Next.js solves this with React Suspense and a few file-system conventions built right into the App Router. Instead of forcing the whole page to wait on the slowest database query, you can stream content to the client piece by piece, and catch unexpected failures without taking down the entire app.
In this post, we’ll build a resilient Next.js loading UI using three tools: loading.js for instant fallback screens, custom <Suspense> boundaries for granular streaming, and error.js for graceful error recovery.
1. Instant Next.js Loading UI with loading.js
Next.js provides a special file convention: loading.js. Drop a loading.js file inside any route folder, and Next.js automatically wraps the matching page.js file inside a React <Suspense> boundary behind the scenes. You don’t have to wire up Suspense by hand for the whole route.
The moment a user navigates to that route, Next.js instantly displays the loading.js fallback UI on the server, while the page’s async server components keep fetching data in the background.
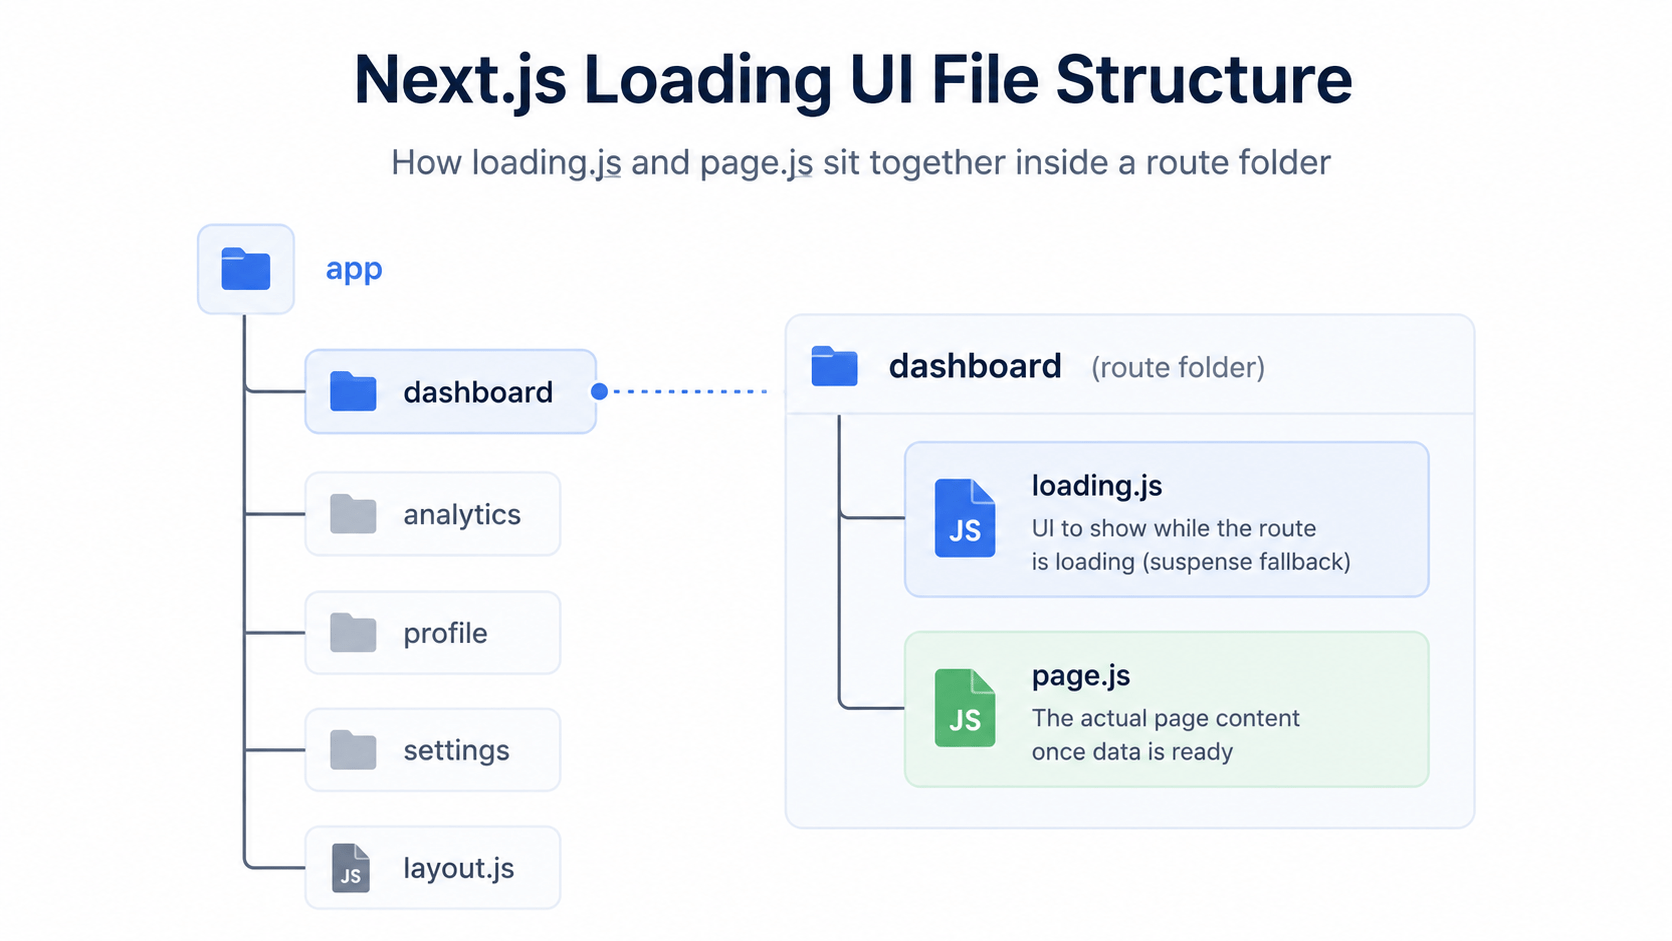
File architecture:
app/
└── dashboard/
    ├── loading.js   <-- Instant fallback UI (e.g., skeleton screens)
    └── page.js      <-- Async server component carrying heavy queries
Example: skeleton loading screen
jsx
// app/dashboard/loading.js

export default function DashboardLoading() {
  return (
    <div style={{ padding: '20px' }}>
      <div style={{ height: '32px', width: '200px', background: '#e2e8f0', marginBottom: '20px', borderRadius: '4px' }} />
      <div style={{ display: 'grid', gridTemplateColumns: 'repeat(3, 1fr)', gap: '16px' }}>
        <div style={{ height: '120px', background: '#f1f5f9', borderRadius: '8px' }} />
        <div style={{ height: '120px', background: '#f1f5f9', borderRadius: '8px' }} />
        <div style={{ height: '120px', background: '#f1f5f9', borderRadius: '8px' }} />
      </div>
    </div>
  );
}
This works well for a whole-page loading UI, but it’s an all-or-nothing fallback. The entire route shows the skeleton until every async component on the page resolves, even the fast ones. That’s where granular Suspense boundaries come in.
2. Granular Streaming with React Suspense Boundaries
loading.js handles the loading state for an entire route. Often you want tighter control instead. Maybe the page header and navigation should render immediately, while slower widgets, like analytics cards or a comments feed, load independently and pop in when they’re ready.
You get that by wrapping individual slow components in React’s <Suspense> component directly inside page.js.
jsx
// app/dashboard/page.js
import { Suspense } from 'react';

// Slow async component 1
async function RevenueMetrics() {
  const data = await fetchRevenue(); // Takes 2 seconds
  return <div className="card">Revenue: ${data.total}</div>;
}

// Slow async component 2
async function RecentOrders() {
  const orders = await fetchOrders(); // Takes 500ms
  return <div>Orders count: {orders.length}</div>;
}

export default function DashboardPage() {
  return (
    <main style={{ padding: '20px' }}>
      <h1>Executive Dashboard</h1>
      <p>This header renders instantly!</p>

      <section style={{ display: 'flex', gap: '20px', marginTop: '20px' }}>
        {/* RecentOrders pops in as soon as its 500ms fetch completes */}
        <Suspense fallback={<div>Loading orders...</div>}>
          <RecentOrders />
        </Suspense>

        {/* RevenueMetrics streams in independently after its 2s fetch */}
        <Suspense fallback={<div>Loading metrics...</div>}>
          <RevenueMetrics />
        </Suspense>
      </section>
    </main>
  );
}
By splitting page queries into separate <Suspense> boundaries, Next.js streams HTML down the same HTTP connection as each component resolves. Fast components render right away. Slower ones pop into place on their own, without blocking the rest of the page.
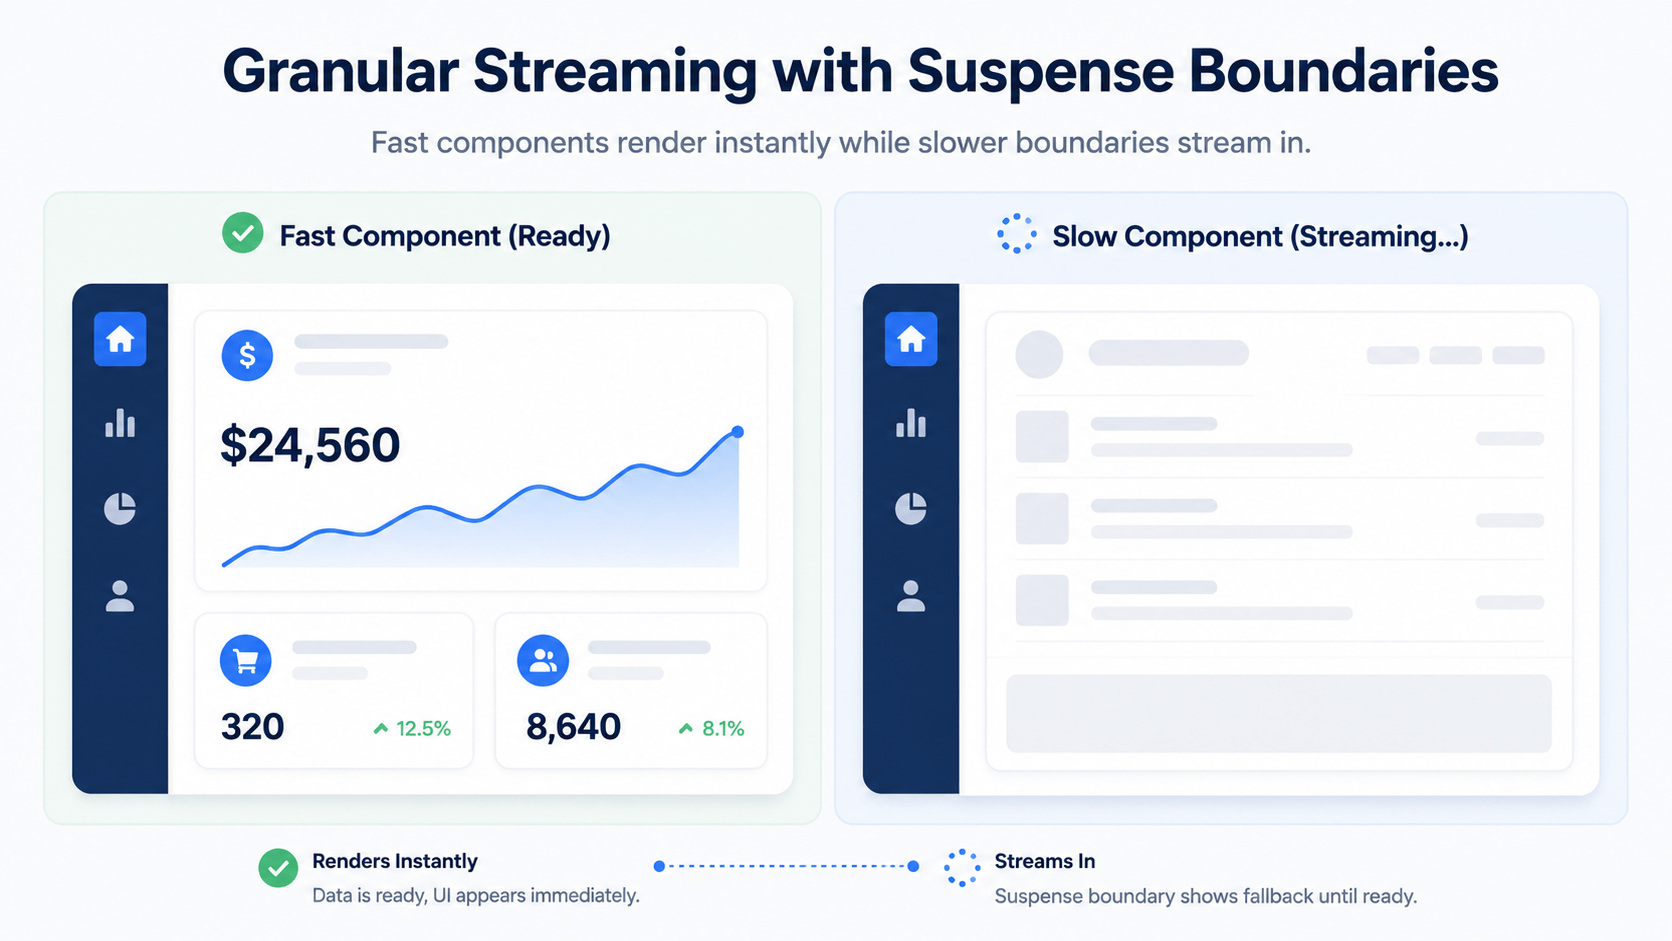
Why a granular Next.js loading UI beats a single loading.js file
A single loading.js fallback is fine for simple routes. But on a dashboard with one slow query and three fast ones, it makes every visitor wait for the slowest piece. Wrapping just the slow component in its own <Suspense> boundary means the fast 90% of the page shows up immediately, and only the genuinely slow part shows a fallback. That’s a meaningfully better loading experience for anything with mixed-speed data sources.
3. Graceful Error Recovery with error.js
What happens when an API goes down, or a database query throws an unhandled exception? Without error handling, the whole app crashes to a blank screen, and the user has no way back except a hard refresh.
Next.js handles this with the error.js file convention. It creates a React Error Boundary around your route. If an unhandled error occurs anywhere inside page.js or its child components, Next.js catches it and shows the error.js fallback UI instead of breaking the entire app.
Important rules for error.js:
- It must be a Client Component, marked with
"use client". - It receives two automatic props:
error(the JavaScriptErrorobject) andreset(a function that re-attempts rendering the route).
Example: catching and recovering from failures
jsx
// app/dashboard/error.js
"use client"; // Error boundaries MUST be Client Components

import { useEffect } from 'react';

export default function DashboardError({ error, reset }) {
  useEffect(() => {
    // Log the error to an observability tool like Sentry or Datadog
    console.error('Dashboard Route Error:', error);
  }, [error]);

  return (
    <div style={{ padding: '20px', border: '1px solid red', borderRadius: '8px' }}>
      <h2>Something went wrong!</h2>
      <p style={{ color: 'red' }}>{error.message || 'Failed to load dashboard data.'}</p>

      {/* Clicking reset attempts to re-render the Server Component route segment */}
      <button
        onClick={() => reset()}
        style={{ padding: '8px 16px', cursor: 'pointer' }}
      >
        Try Again
      </button>
    </div>
  );
}
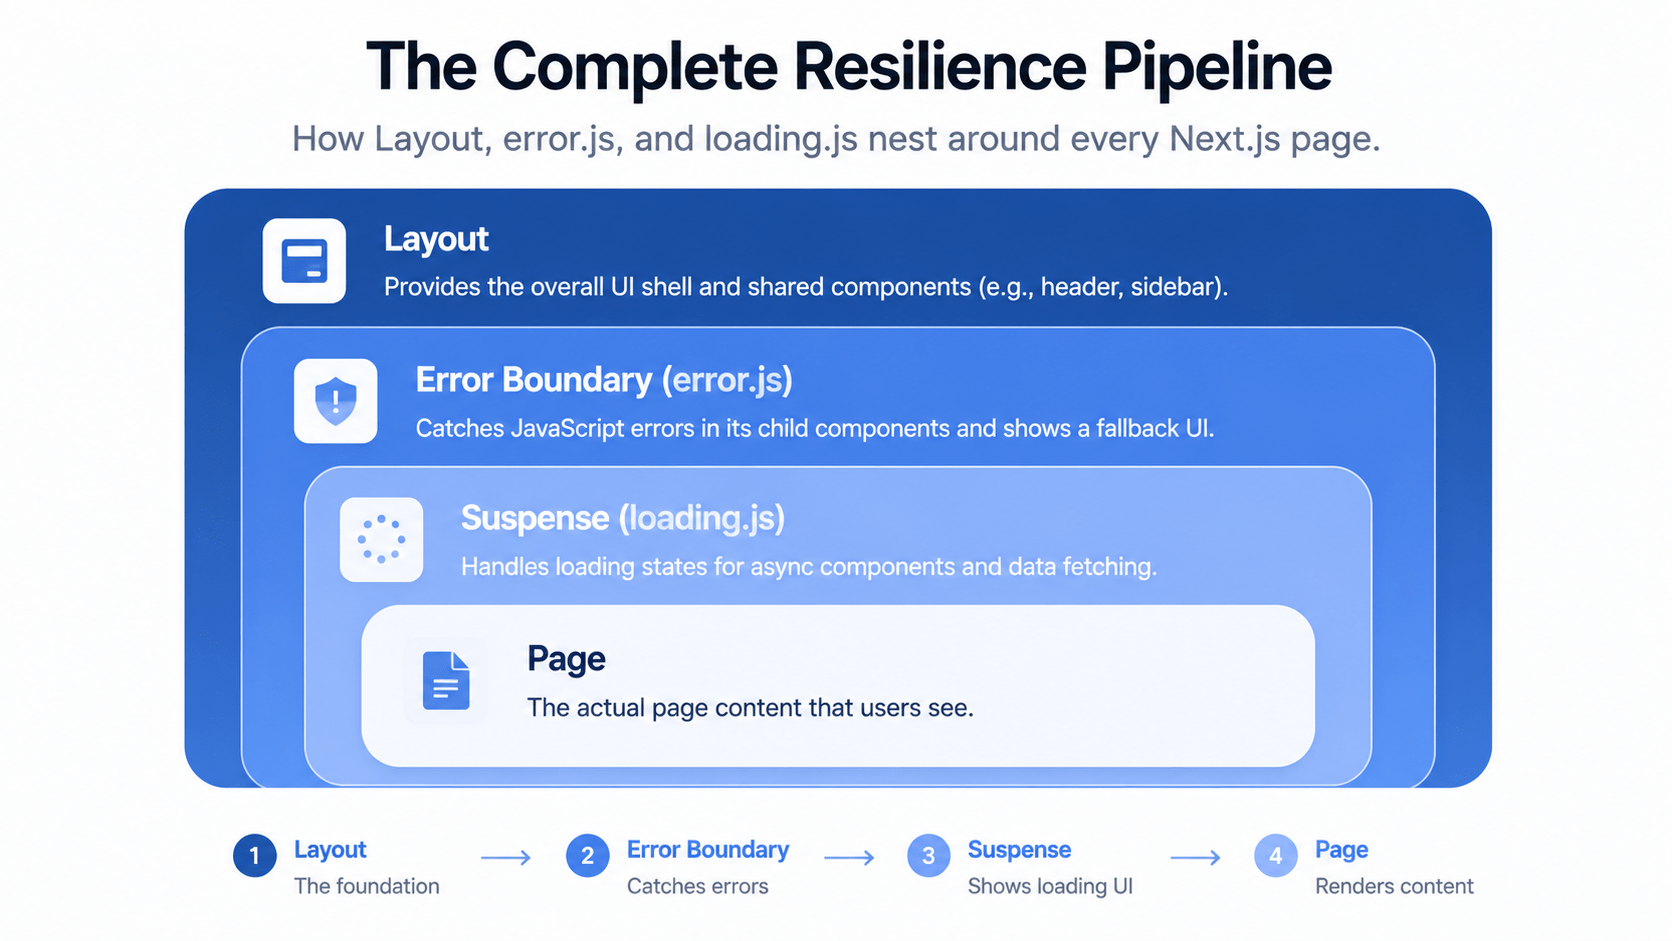
The Complete Resilience Pipeline
Next.js organizes these file conventions into a clean tree under the hood:
<Layout>
  <ErrorBoundary fallback={<Error />}>
    <Suspense fallback={<Loading />}>
      <Page />
    </Suspense>
  </ErrorBoundary>
</Layout>
Because Layout sits outside both Error and Loading, your top navigation bar and sidebar stay fully interactive even if a specific page fails or takes a long time to load.
Quick Reference: Which Tool Solves Which Problem
Use this table any time you’re deciding which piece of the loading and error toolkit fits the situation in front of you.
Loading & Error Handling in Next.js
The right tool for each async scenario
| Problem | Tool | Scope |
|---|---|---|
| Whole route needs a fallback while data loads |
01
loading.js
|
Entire route |
| Only one slow widget should show a fallback |
02
<Suspense> boundary
|
Single component |
| An error should not crash the whole app |
03
error.js
|
Route-level error boundary |
FAQ
Does loading.js replace the need for <Suspense>?
No. loading.js is Next.js automatically wrapping your whole route in one <Suspense> boundary for you. A complete Next.js loading UI still adds its own <Suspense> boundaries inside page.js when you want more than one loading state on the same page.
Can I use error.js and loading.js in the same route folder?
Yes, and it’s the recommended pattern. loading.js handles the wait, error.js handles the failure, and together they cover both outcomes of an async fetch.
Why does error.js have to be a Client Component?
Error boundaries rely on React lifecycle behavior that only works in Client Components. Server Components can’t catch errors the same way, so Next.js requires "use client" at the top of the file.
What happens if I don’t add an error.js file?
Next.js falls back to its default error UI, which is far less helpful to users and gives you no way to customize the recovery experience or log the error to a tool like Sentry.
Does a slow Suspense boundary block the rest of the page from becoming interactive?
No. That’s the entire point of streaming. Fast boundaries hydrate and become interactive while slower ones are still resolving in the background.
Conclusion
Loading and error handling used to mean writing your own spinners, your own try/catch wrappers, and hoping you covered every edge case. With loading.js for instant page feedback, <Suspense> boundaries for granular streaming, and error.js for automatic fault isolation, Next.js gives you a resilient Next.js loading UI out of the box. Start with a single loading.js file on your slowest route, then split out one <Suspense> boundary the next time a fast component gets stuck waiting on a slow one.