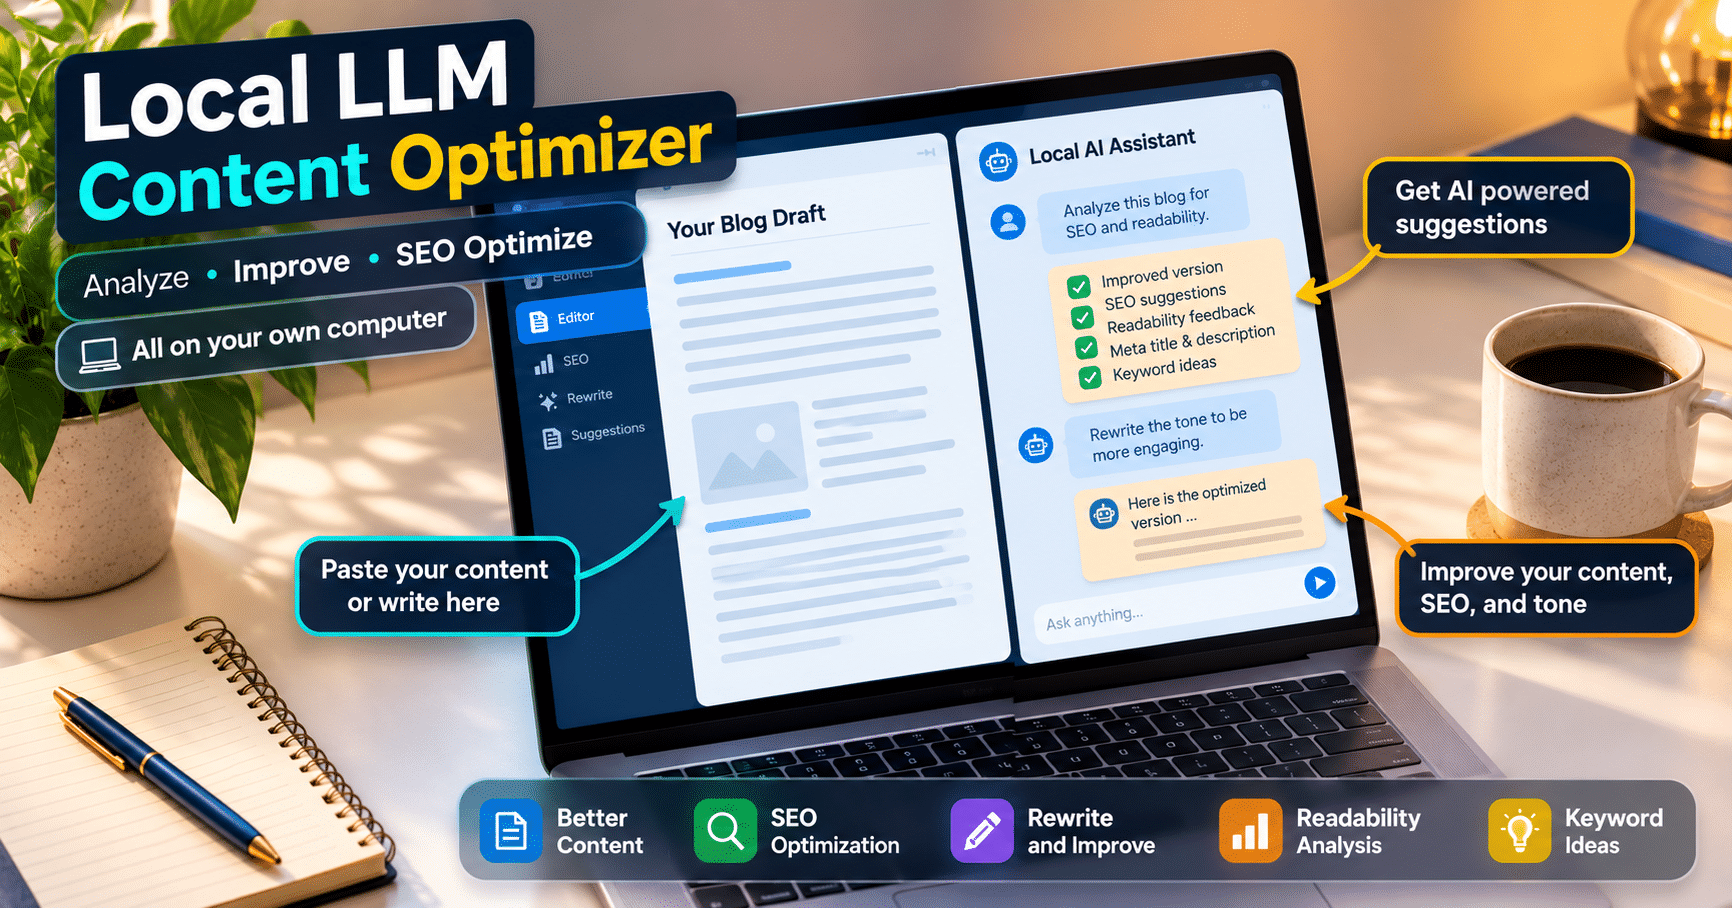

A local LLM app is the best way to prove that everything in this series actually works together. Welcome to Part 5, the finale of our Full-Stack AI Development series.
Now we tie it all together into a portfolio-ready project: the Local LLM Content Optimizer. You paste a draft blog post, and the AI checks its readability and pulls out keywords.
The catch is that everything runs on your own machine. Your draft never leaves your laptop, and you pay zero API fees. If your internet is slow or you don’t have an international card, that matters: after the one-time model download, the whole local LLM app works offline.
How This Local LLM App Fits Together
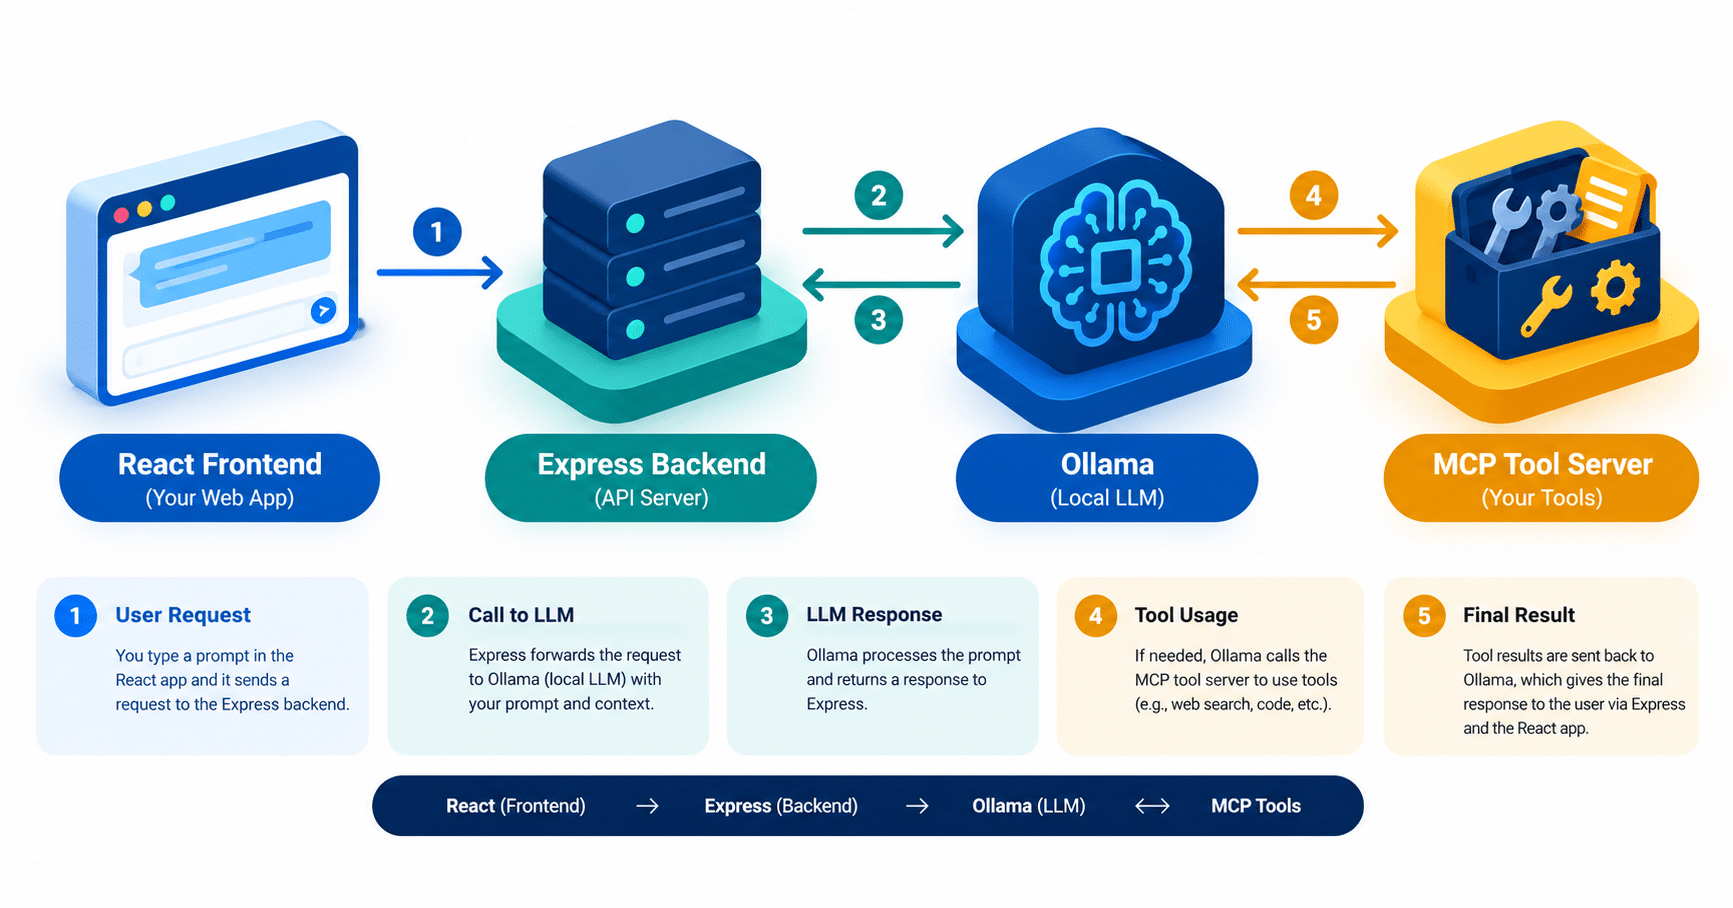
Before writing code, let’s look at the flow. Three pieces work together:
- The React frontend: built with Vite and Tailwind CSS. You paste your text and type a prompt like “Analyze the readability of this text.”
- The Express backend (the AI host): receives the request, talks to your local Ollama instance, and acts as an MCP client.
- The MCP server: a separate Node.js process that exposes content analysis tools,
calculate_readabilityandextract_seo_keywords.
Here is the path of one request through the local LLM app. React sends your message and document to Express. Express starts the MCP server, loads its tools, and hands them to the model. The model decides which tool to call, and the result streams back to React.
Before You Start
To build this local LLM app, you need Node.js 18 or newer and Ollama installed. Then pull a model that supports tool calling:
bash
ollama pull llama3.1
Tool calling is the part people miss. The plain llama3 model does not support tools in Ollama, so your tools would never fire. Use llama3.1 or another tool-capable model.
Install the packages. This tutorial uses AI SDK 4.x, because useChat and the streaming helpers changed in version 5:
bash
npm install ai@^4.2 ollama-ai-provider @modelcontextprotocol/sdk zod express cors
Step 1: Build the Tools for Your Local LLM App
First, let’s create the tools our local LLM app will use. The Model Context Protocol gives us a standard way to expose them. In a new folder (or by adapting the server from Part 3), create an MCP server with two tools.
Tool 1: The Readability Calculator
This tool counts words and sentences, then returns the average words per sentence. It is a simplified metric, not a full Flesch score, but it gives the local LLM app something real to work with.
Tool 2: A Keyword Extractor Your Local LLM App Can Trust
The first version of this tutorial returned a hardcoded keyword list. That is fine for a demo, but it teaches the wrong lesson. This version counts word frequency and skips common stop words, so the output actually depends on the text.
javascript
// mcp-content-server.js
import { McpServer } from "@modelcontextprotocol/sdk/server/mcp.js";
import { StdioServerTransport } from "@modelcontextprotocol/sdk/server/stdio.js";
import { z } from "zod";

const server = new McpServer({
  name: "content-optimizer-tools",
  version: "1.0.0",
});

const STOP_WORDS = new Set([
  "the", "and", "for", "with", "that", "this", "from", "are", "was",
  "were", "but", "you", "your", "our", "have", "has", "not", "can",
]);

// Tool 1: Readability Calculator
server.tool(
  "calculate_readability",
  "Calculates the average words per sentence for a given text",
  { text: z.string() },
  async ({ text }) => {
    const words = text.split(/\s+/).filter(Boolean);
    const sentences = text.split(/[.!?]+/).filter((s) => s.trim().length > 0);
    const average = sentences.length ? Math.round(words.length / sentences.length) : 0;

    return {
      content: [{
        type: "text",
        text: `Average words per sentence: ${average}. Lower is generally easier to read.`,
      }],
    };
  }
);

// Tool 2: Keyword Extractor (word frequency, no NLP library)
server.tool(
  "extract_seo_keywords",
  "Returns the 3 most frequent meaningful words in a text",
  { text: z.string() },
  async ({ text }) => {
    const counts = {};
    for (const word of text.toLowerCase().match(/[a-z0-9']+/g) ?? []) {
      if (word.length > 3 && !STOP_WORDS.has(word)) {
        counts[word] = (counts[word] ?? 0) + 1;
      }
    }
    const top = Object.entries(counts)
      .sort((a, b) => b[1] - a[1])
      .slice(0, 3)
      .map(([word, n]) => `${word} (${n}x)`);

    return {
      content: [{ type: "text", text: `Top keywords: ${top.join(", ") || "none found"}` }],
    };
  }
);

async function main() {
  const transport = new StdioServerTransport();
  await server.connect(transport);
  console.error("Content MCP Server running on stdio");
}

main().catch(console.error);
Frequency counting is not real keyword research. For production, swap in a proper NLP library or an SEO data source.
Step 2: Connect Express, Ollama, and the MCP Server
Now we need the Express server of our local LLM app to talk to both Ollama and the MCP server. In the first draft of this post, we skipped the tool wiring “for brevity.” That left the tools object empty, so nothing would run.
Here is the working version. The Vercel AI SDK can connect to an MCP server over stdio, load its tools, and pass them straight into streamText:
javascript
// server.js
import express from "express";
import cors from "cors";
import { streamText, experimental_createMCPClient } from "ai";
import { Experimental_StdioMCPTransport } from "ai/mcp-stdio";
import { createOllama } from "ollama-ai-provider";

const app = express();
app.use(cors());
app.use(express.json());

const ollama = createOllama({ baseURL: "http://localhost:11434/api" });

app.post("/api/optimize", async (req, res) => {
  const { messages, documentText } = req.body;

  // Spawn the MCP server as a child process and connect over stdio
  const mcpClient = await experimental_createMCPClient({
    transport: new Experimental_StdioMCPTransport({
      command: "node",
      args: ["mcp-content-server.js"],
    }),
  });

  const systemPrompt = `You are an expert content editor.
The user is working on this document:
---
${documentText}
---
Use your tools to help optimize it. When you call a tool,
pass the full document text as the "text" argument.`;

  try {
    const tools = await mcpClient.tools();

    const result = streamText({
      model: ollama("llama3.1"),
      system: systemPrompt,
      messages,
      tools,
      maxSteps: 5, // lets the model call a tool, then answer with the result
      onFinish: async () => {
        await mcpClient.close();
      },
    });

    result.pipeDataStreamToResponse(res);
  } catch (error) {
    console.error(error);
    await mcpClient.close();
    res.status(500).send("Error processing request");
  }
});

app.listen(3001, () => console.log("AI Host running on port 3001"));
Two details matter here. The system prompt tells the model to pass the document as the text argument, because small models won’t guess that. And maxSteps lets the model use a tool result in its final answer.
Spawning a new MCP process per request is simple, but wasteful. In production, create the client once and reuse it.
Step 3: Build the React Frontend
Finally, let’s build the UI for the local LLM app. We need a text area for the document and a chat panel for the AI.
Connecting the Chat UI to Your Local LLM App
The useChat hook does the heavy lifting. Its body option sends the document text with every message, and toolInvocations lets us show tool states, as we did in Part 4.
tsx
// App.tsx (unchanged from the original draft)
(Keep your original App.tsx block exactly as published. No changes were needed.)
Run It and Test the Tool Calls
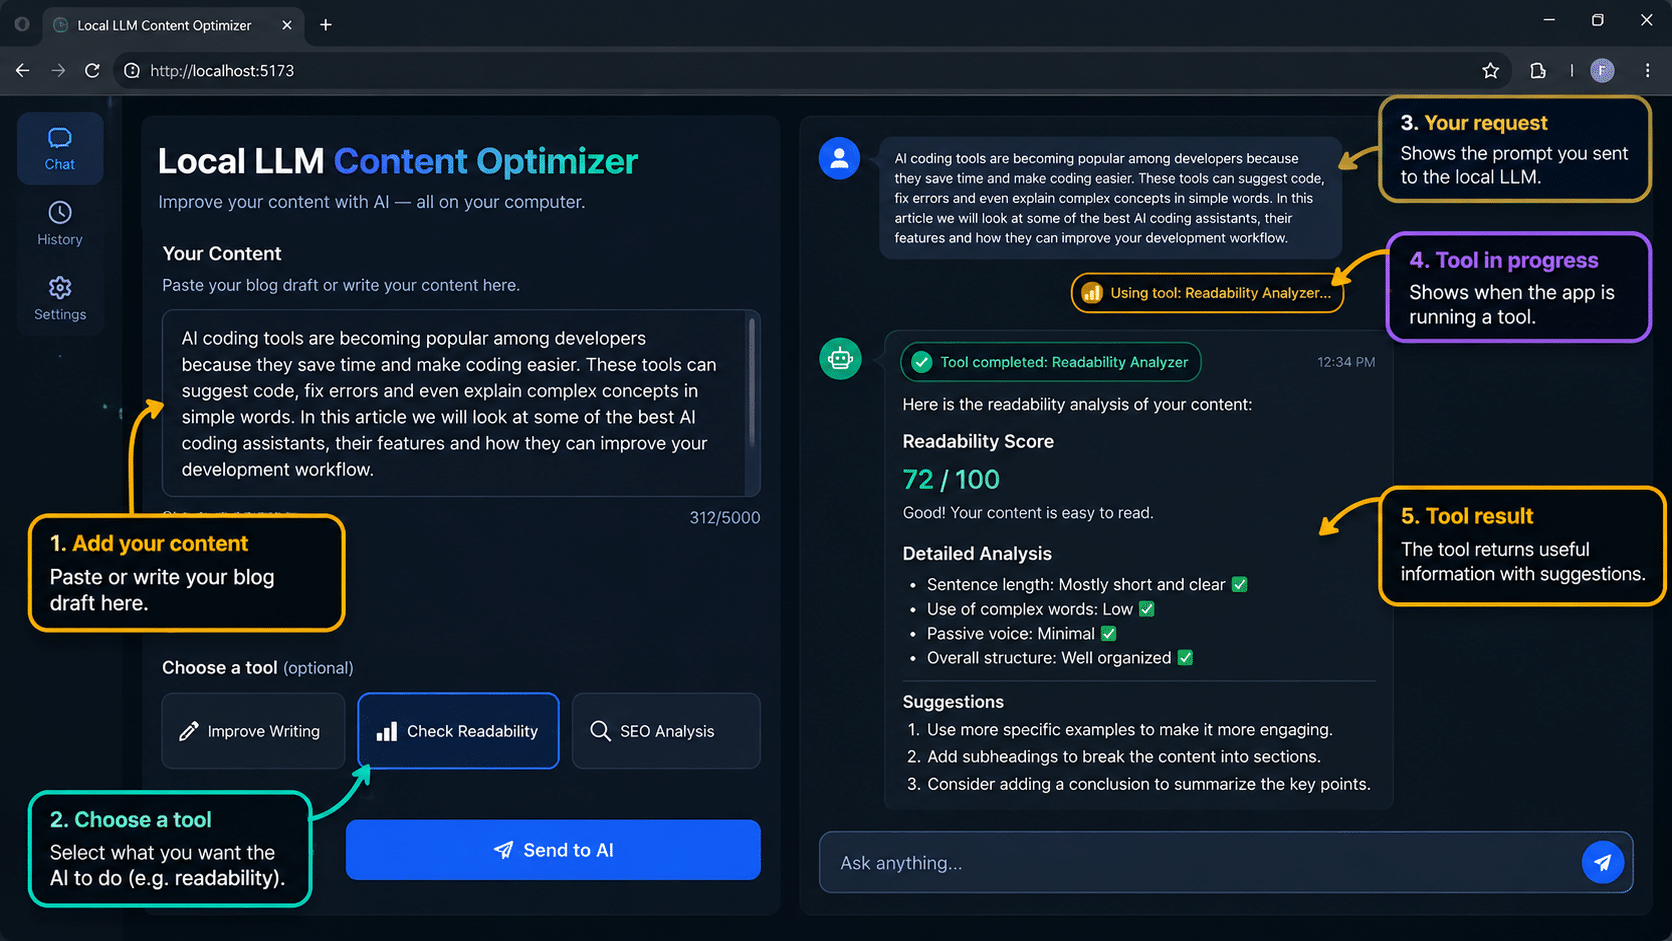
Open three terminals. Make sure Ollama is running, start the backend with node server.js, and start Vite with npm run dev. Paste a draft into your local LLM app, then ask: “Check the readability of this text.”
You should see the amber “Running calculate_readability…” badge, followed by the green check. Small models sometimes skip tools. If that happens, name the tool in your prompt.
Step 4: Deploy Your Local LLM App to a VPS
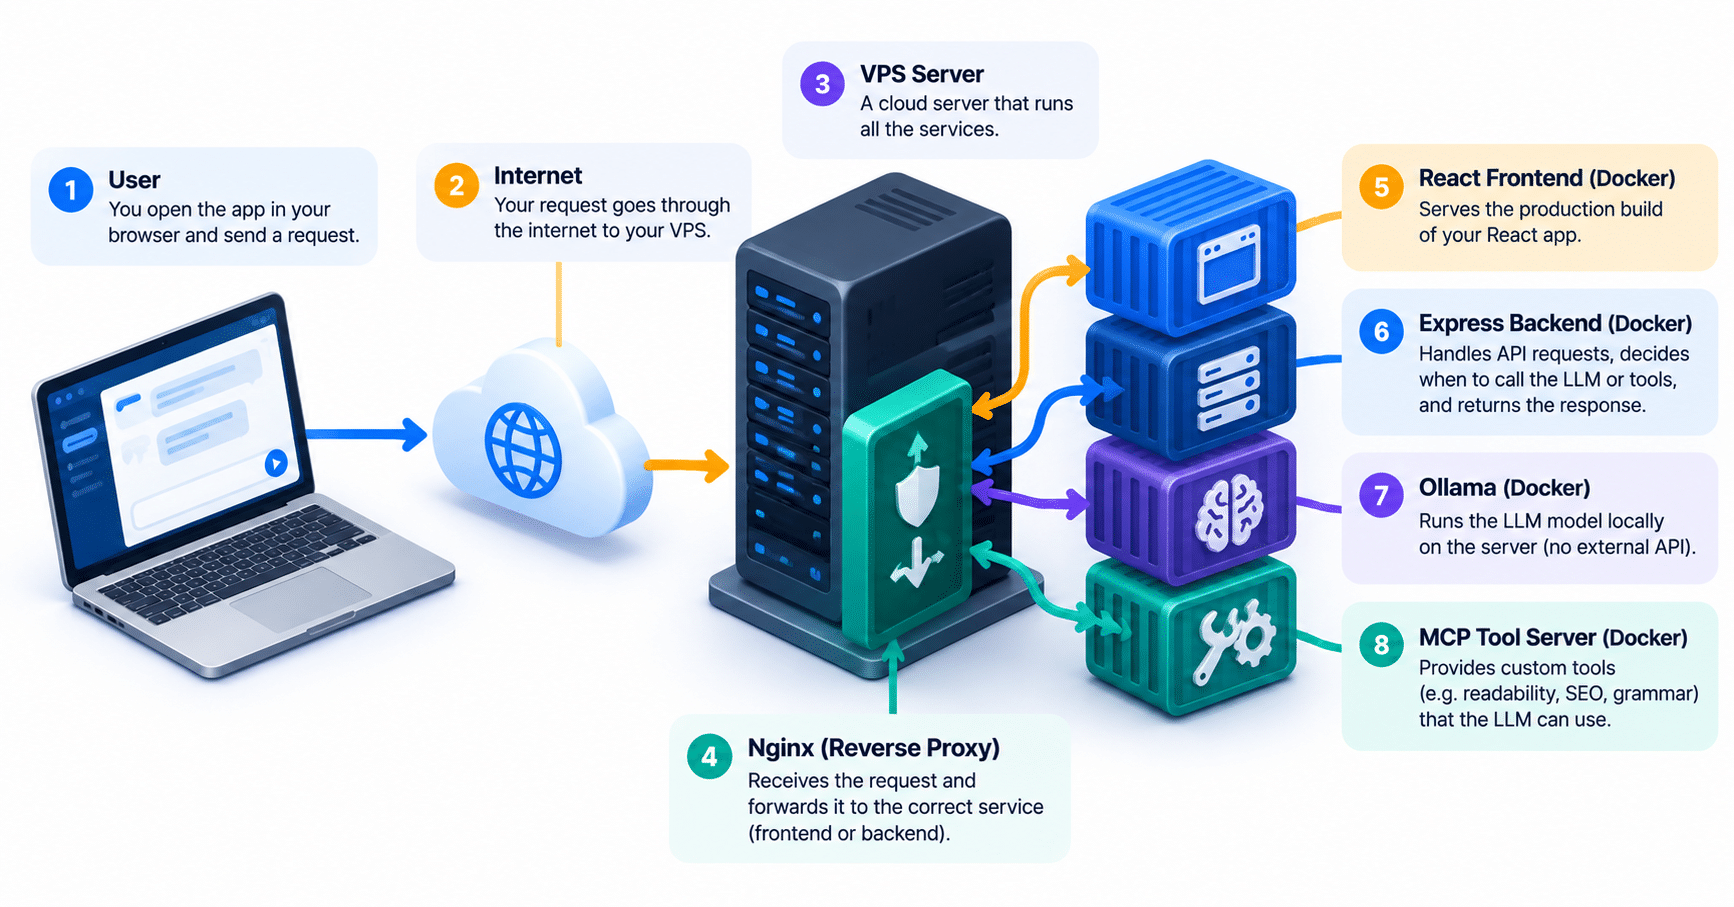
Running this locally is great, but full-stack development means shipping. Deploying an LLM is harder than deploying a normal app, so here is a realistic playbook:
- Dockerize: write a Dockerfile for the React frontend and one for the Express backend. The MCP server runs as a child process of Express over stdio, so it ships inside the backend image and needs no container of its own. Link everything with Docker Compose.
- Pick a VPS with enough RAM: serverless platforms often time out on long LLM generations, so rent a VPS from DigitalOcean, Hetzner, or AWS EC2. Ollama’s own guidance is at least 8 GB of RAM for 7B models, so a tiny entry-level plan won’t cope. Expect slow replies without a GPU.
- Add an Nginx reverse proxy: install Nginx to proxy traffic from api.yourdomain.com to port 3001 and serve your React static files.
- Run Ollama in Docker: put Ollama in a container on the same VPS, so your data never leaves your server.
Local LLM App FAQs
Can I run this local LLM app without a GPU?
Yes. Ollama runs models on the CPU, so this local LLM app works without a GPU, but responses are slower. If replies feel too slow, try a smaller model.
Why does the model ignore my tools?
Not every model supports tool calling. Use llama3.1 or another model marked as tool-capable in the Ollama library, and keep your tool descriptions short and specific.
Is my text really private?
During development, your draft travels from the browser to Express to Ollama, all on your machine. Nothing goes to a third-party API. After you deploy, it lives on your own server.
Do I need MCP for a project this small?
No. You could define the tools directly inside streamText. MCP pays off when you want the same tools to work with other clients, like an IDE or a desktop assistant.
Is this a good portfolio project?
Yes, a local LLM app like this stands out. Add a README, a screenshot, a Docker Compose file, and a short demo video. Then extend it with a real NLP library, and mention the tradeoffs you made.
Conclusion
You have gone from the basics of web architecture to a modular, context-aware local LLM app. Tools live in an MCP server, the Vercel AI SDK abstracts the model, and React handles the state.
Your next step for this local LLM app is simple: replace the frequency-based keyword tool with something smarter, then push the project to GitHub. If you want a different model for your build, browse open models on Hugging Bay, Tekraze’s own AI model registry.
The AI landscape changes every week, but strong architecture does not. Keep building, and welcome to the next era of full-stack development.