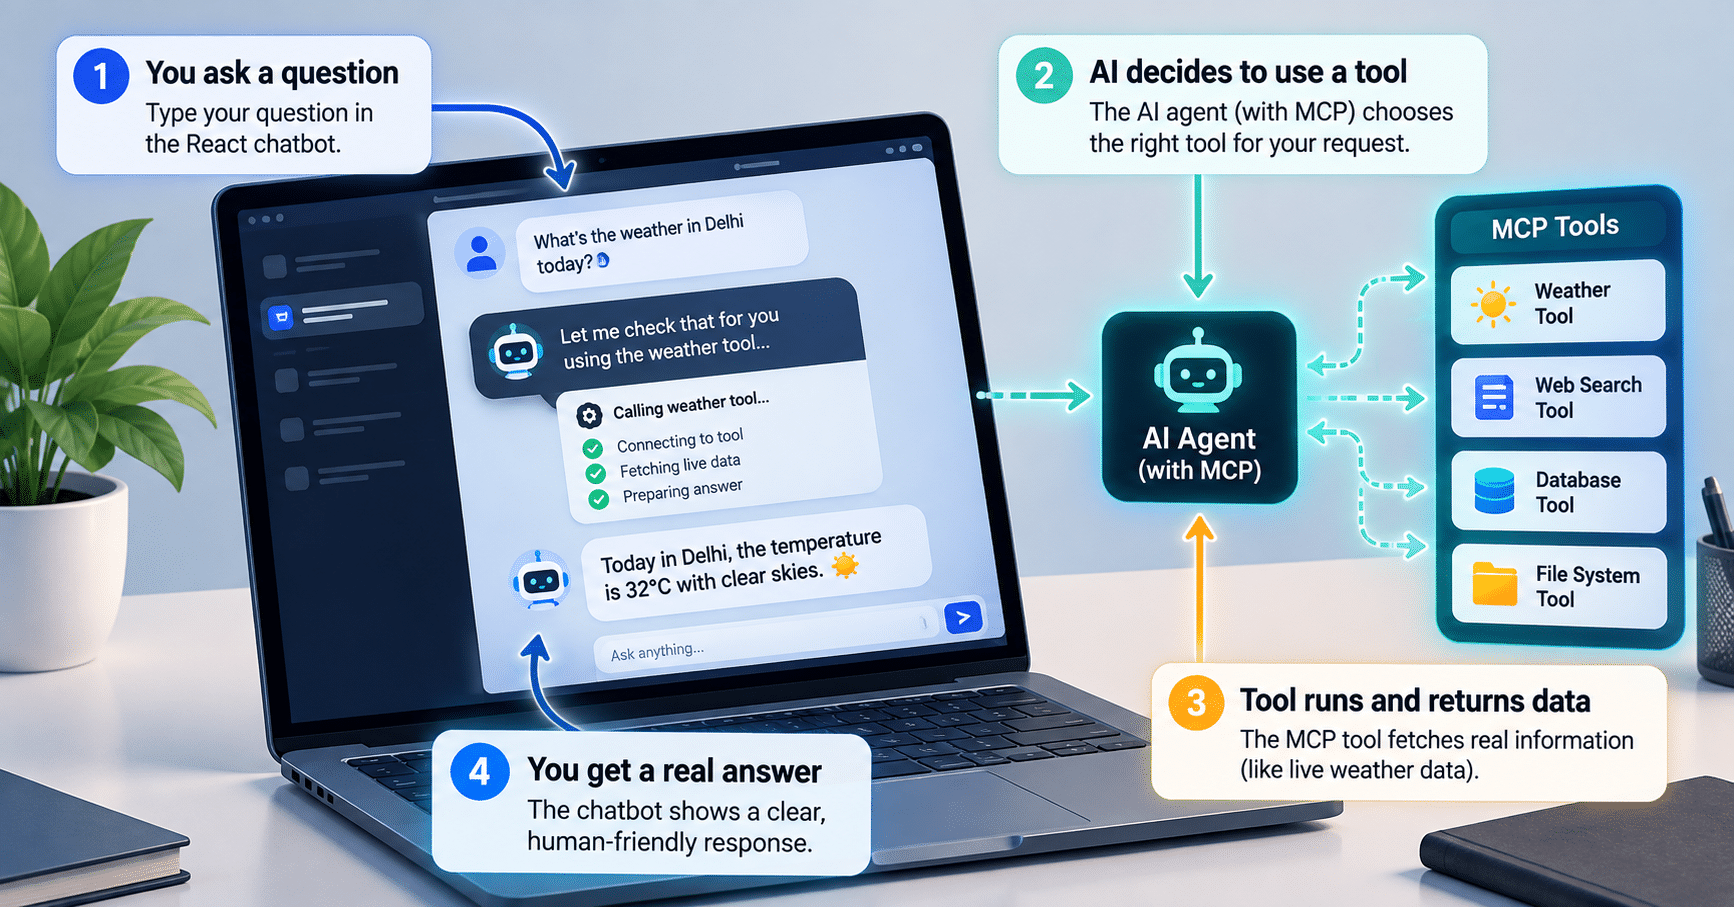

Building a React AI chatbot is the moment an AI project stops being a terminal demo and starts feeling like a real product.
In Part 3, we built a Node.js server with the Model Context Protocol (MCP) and gave our AI a get_weather tool. We tested it locally over standard input/output (stdio). But we’re full-stack developers, and our end goal isn’t a terminal prompt. It’s a sleek, interactive web app.
In this post, we’ll bridge that gap. You’ll connect a React frontend to an AI backend using Server-Sent Events (SSE) and the Vercel AI SDK. You’ll also learn how to show users what’s happening when the AI starts “using tools.” By the end, your React AI chatbot will stream answers and display live tool status.
Also Read: Introduction to React Basics and the Next.js Framework | Setting Up a React.js and Next.js Project
How a React AI Chatbot Talks to an MCP Server
Before writing code, let’s picture the flow. In a web app, your React frontend doesn’t connect straight to an MCP server. A middleman sits between them:
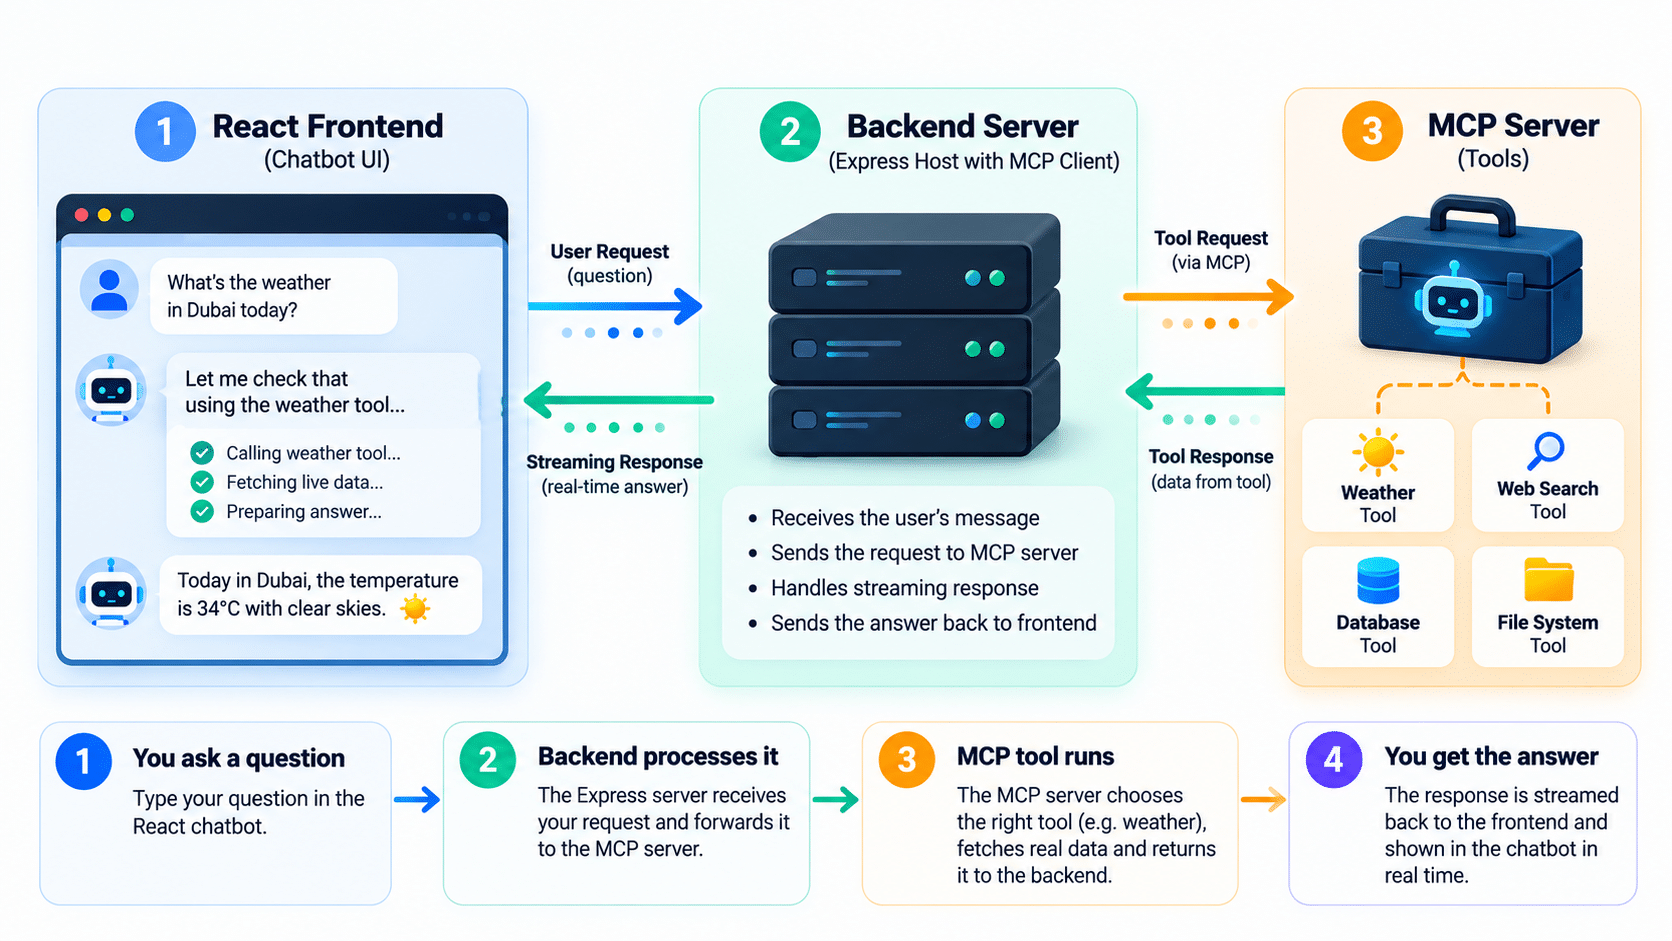
- React frontend (the UI): captures user input and streams the conversation.
- Node.js/Express backend (the AI host): holds your API keys (OpenAI, Groq, or a local Ollama model), receives the prompt, and acts as the MCP client.
- MCP server (the tools): the weather service from Part 3.
In our React AI chatbot, say the user asks, “What’s the weather in Dubai?” The backend realizes it needs a tool, queries the MCP server, and feeds the result back to the LLM. Then it streams the final natural-language answer to the React frontend.
Step 1: Set Up the React Frontend
Let’s spin up the front end of our React AI chatbot with a modern React app. I recommend Vite for its fast dev experience.
bash
npm create vite@latest ai-frontend -- --template react-ts
cd ai-frontend
npm install
npm install ai @ai-sdk/react
Notice that we install the ai package (the Vercel AI SDK) and its React bindings, @ai-sdk/react. The UI hooks live in the second package. The code below also uses Tailwind CSS classes, so add Tailwind to your Vite project if you want the same styling.
Step 2: Build the Chat Window with useChat
Historically, building a React AI chatbot meant juggling WebSockets, stitching chunks together by hand, and tracking messy state. The Vercel AI SDK wraps all of that in one hook: useChat.
Why useChat Makes Your React AI Chatbot Simpler
useChat keeps the message history, tracks the streaming status, and sends each new message to your backend. You only write the UI. Create a component called ChatWindow.tsx:
tsx
import { useState } from 'react';
import { useChat } from '@ai-sdk/react';
import { DefaultChatTransport } from 'ai';

export default function ChatWindow() {
  const [input, setInput] = useState('');

  // useChat manages message history and streaming state for us
  const { messages, sendMessage, status } = useChat({
    transport: new DefaultChatTransport({
      api: 'http://localhost:3001/api/chat', // your Express backend
    }),
  });

  const isBusy = status === 'submitted' || status === 'streaming';

  const handleSubmit = (e: React.FormEvent) => {
    e.preventDefault();
    if (!input.trim()) return;
    sendMessage({ text: input });
    setInput('');
  };

  return (
    <div className="flex flex-col h-screen max-w-2xl mx-auto p-4">
      <h1 className="text-2xl font-bold text-center mb-4">AI Weather Assistant</h1>

      <div className="flex-1 overflow-y-auto space-y-4 mb-4">
        {messages.map((m) => (
          <div
            key={m.id}
            className={`p-4 rounded-lg max-w-[80%] ${
              m.role === 'user' ? 'bg-blue-100 ml-auto' : 'bg-gray-100 mr-auto'
            }`}
          >
            <span className="font-bold block mb-1">
              {m.role === 'user' ? 'You' : 'AI Agent'}:
            </span>
            {m.parts.map((part, i) =>
              part.type === 'text' ? <p key={i}>{part.text}</p> : null
            )}
          </div>
        ))}
        {isBusy && <div className="text-gray-400 animate-pulse">AI is typing...</div>}
      </div>

      <form onSubmit={handleSubmit} className="flex gap-2">
        <input
          value={input}
          onChange={(e) => setInput(e.target.value)}
          placeholder="Ask about the weather..."
          className="flex-1 p-3 border rounded-lg focus:outline-none focus:ring-2 focus:ring-blue-500"
        />
        <button
          type="submit"
          disabled={isBusy}
          className="bg-blue-600 text-white px-6 py-3 rounded-lg disabled:opacity-50"
        >
          Send
        </button>
      </form>
    </div>
  );
}
With a few dozen lines, you have a working streaming chat interface.
Step 3: Show Tool Calls in the UI
Here is where an agentic React AI chatbot differs from a plain chatbot.
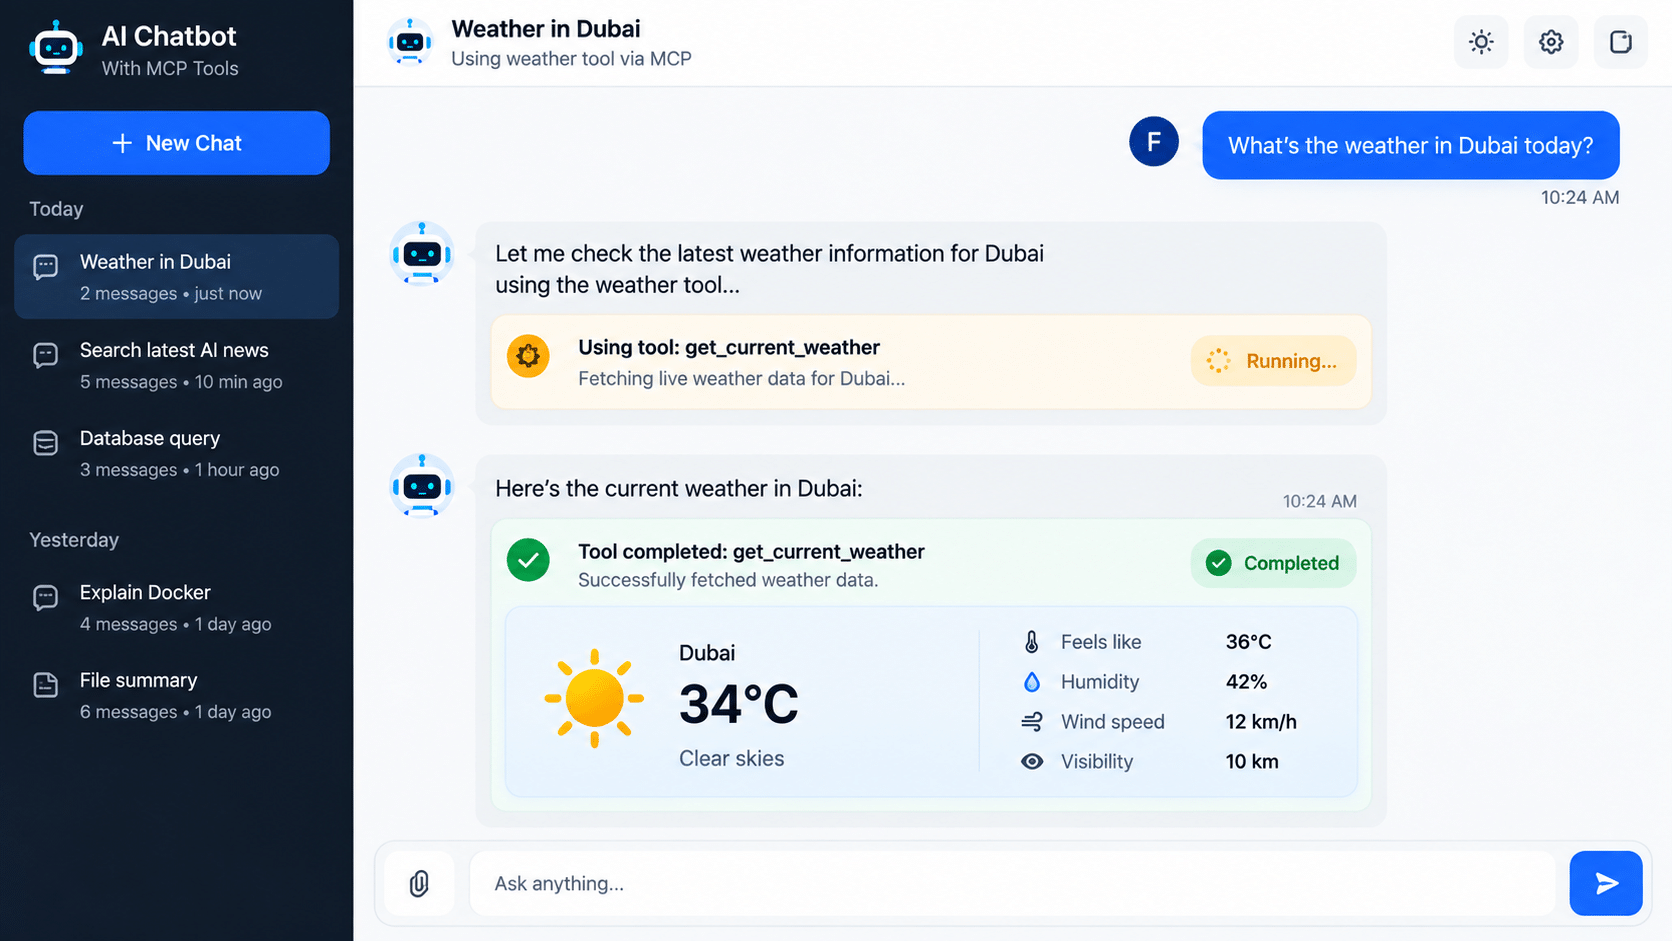
When someone asks for the weather, the AI doesn’t stream text right away. First it pauses to call get_weather. If the UI ignores that, the user stares at a blank screen and wonders whether the app crashed.
So we give visual feedback that the AI is working. In current AI SDK versions, each message has a parts array, and tool calls show up there as parts named tool-<toolName>. Each carries a state such as input-available (the tool is running) or output-available (the result is back). Replace the text-only mapping inside your message loop with this:
tsx
{m.parts.map((part, i) => {
  if (part.type === 'text') {
    return <p key={i}>{part.text}</p>;
  }

  if (part.type === 'tool-get_weather') {
    if (part.state === 'output-available') {
      return (
        <div key={i} className="text-sm text-green-600 bg-green-50 p-2 rounded mt-2">
          ✅ <strong>get_weather</strong> completed successfully.
        </div>
      );
    }
    return (
      <div key={i} className="text-sm text-amber-600 bg-amber-50 p-2 rounded mt-2 animate-pulse">
        ⏳ Using tool <strong>get_weather</strong>...
      </div>
    );
  }

  return null;
})}
A version note: older tutorials import useChat from ai/react and read m.content and m.toolInvocations. Newer releases of the AI SDK replaced that with @ai-sdk/react and message parts. Check the official AI SDK docs for the version you’ve installed, since the API has changed between major releases.
Why This Matters for UX
Rendering tool status builds trust in any React AI chatbot. Users see a badge like “⏳ Using tool get_weather…” and understand why a two-second delay happens before the answer streams in.
Backend Note: Streaming Tool Calls with SSE
The frontend handles the UI, but the backend of your React AI chatbot must pass tool calls back and forth. Using the Vercel AI SDK on the server (as we set up in Part 2), you bind your MCP tools through the tools option of streamText.
As the backend runs each tool, the SDK streams the state changes to the browser as Server-Sent Events (SSE). That updates the message parts we rendered above in real time.
Conclusion
You now have every piece of a modern AI app:
- A strong web-dev foundation (Part 1).
- Cost-effective AI routing with the Vercel AI SDK and Ollama (Part 2).
- A standard way to connect external APIs through MCP servers (Part 3).
- A reactive, streaming React AI chatbot with clear tool feedback (Part 4).
In the 5th and final part, we’ll build a capstone: a “Local LLM Content Optimizer.” It ties the frontend, the backend, and an MCP-connected local model into one deployable app, and it builds directly on this React AI chatbot.