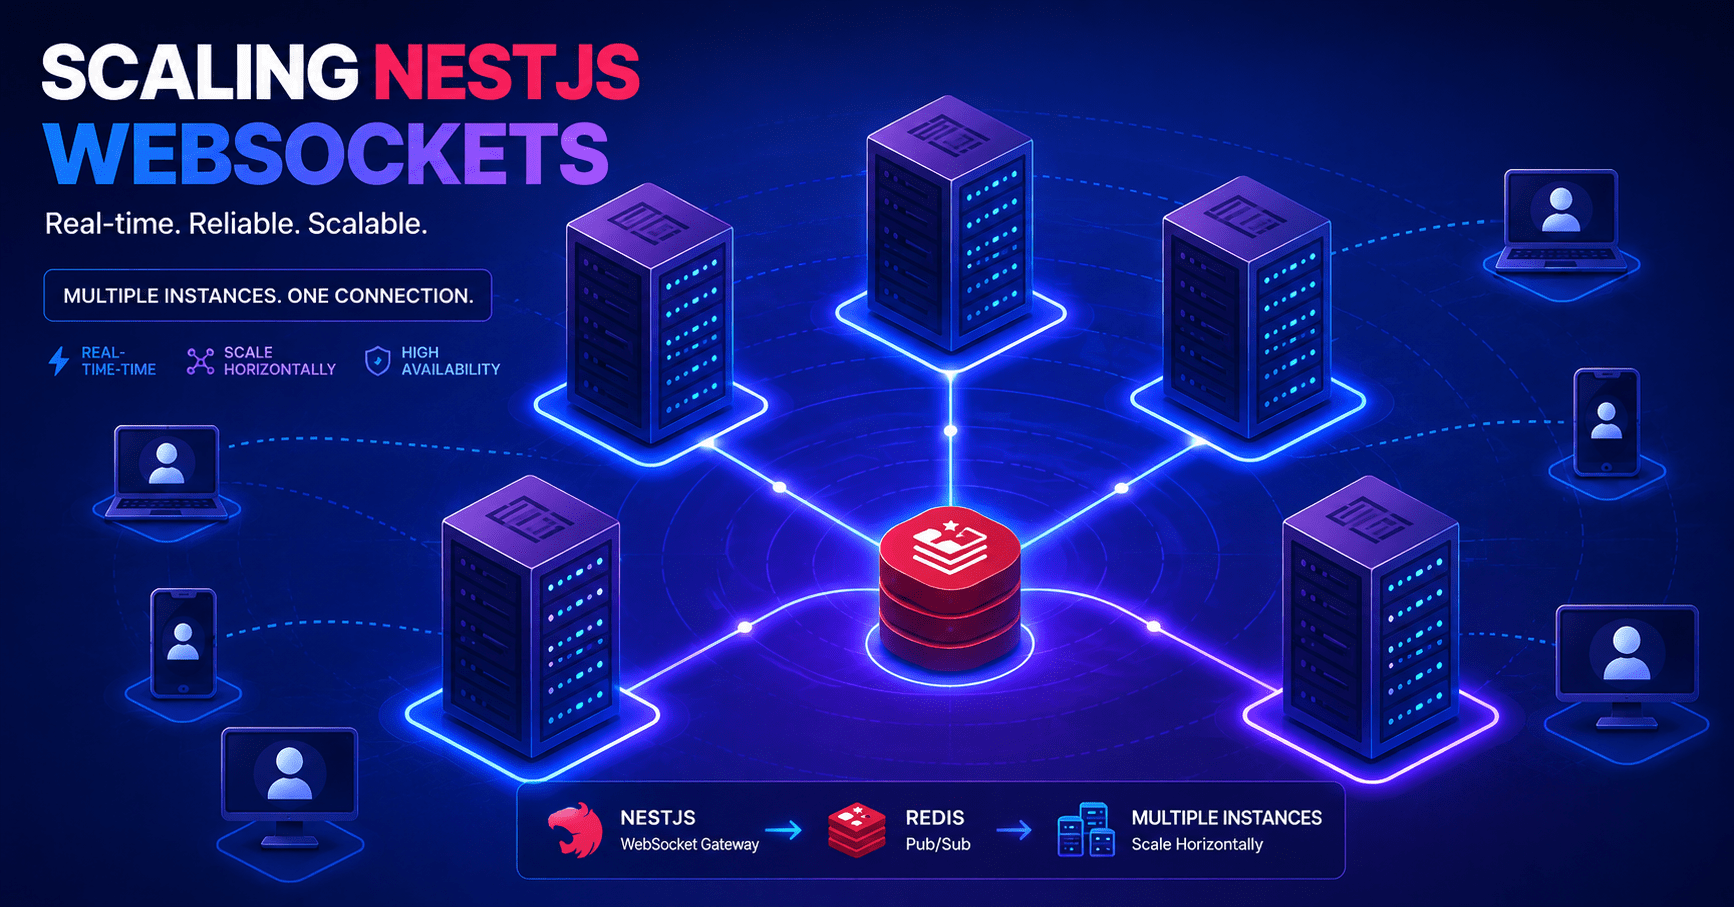

Real-time responsiveness is table stakes now live chat, collaborative editing, push notifications, financial tickers, all of it depends on a persistent, bidirectional channel instead of a pull-based HTTP request. That’s exactly what NestJS WebSockets are built for, and exactly where a naive setup falls apart the moment you scale past one server.
This post is Blog Post 34 in our NestJS series, picking up right where NestJS Authentication left off. We’ll build a scalable, real-time event-driven architecture using NestJS WebSockets (@nestjs/websockets), Socket.io, a Redis Pub/Sub adapter, and NestJS Microservices.
The Real-Time Scaling Problem Behind NestJS WebSockets
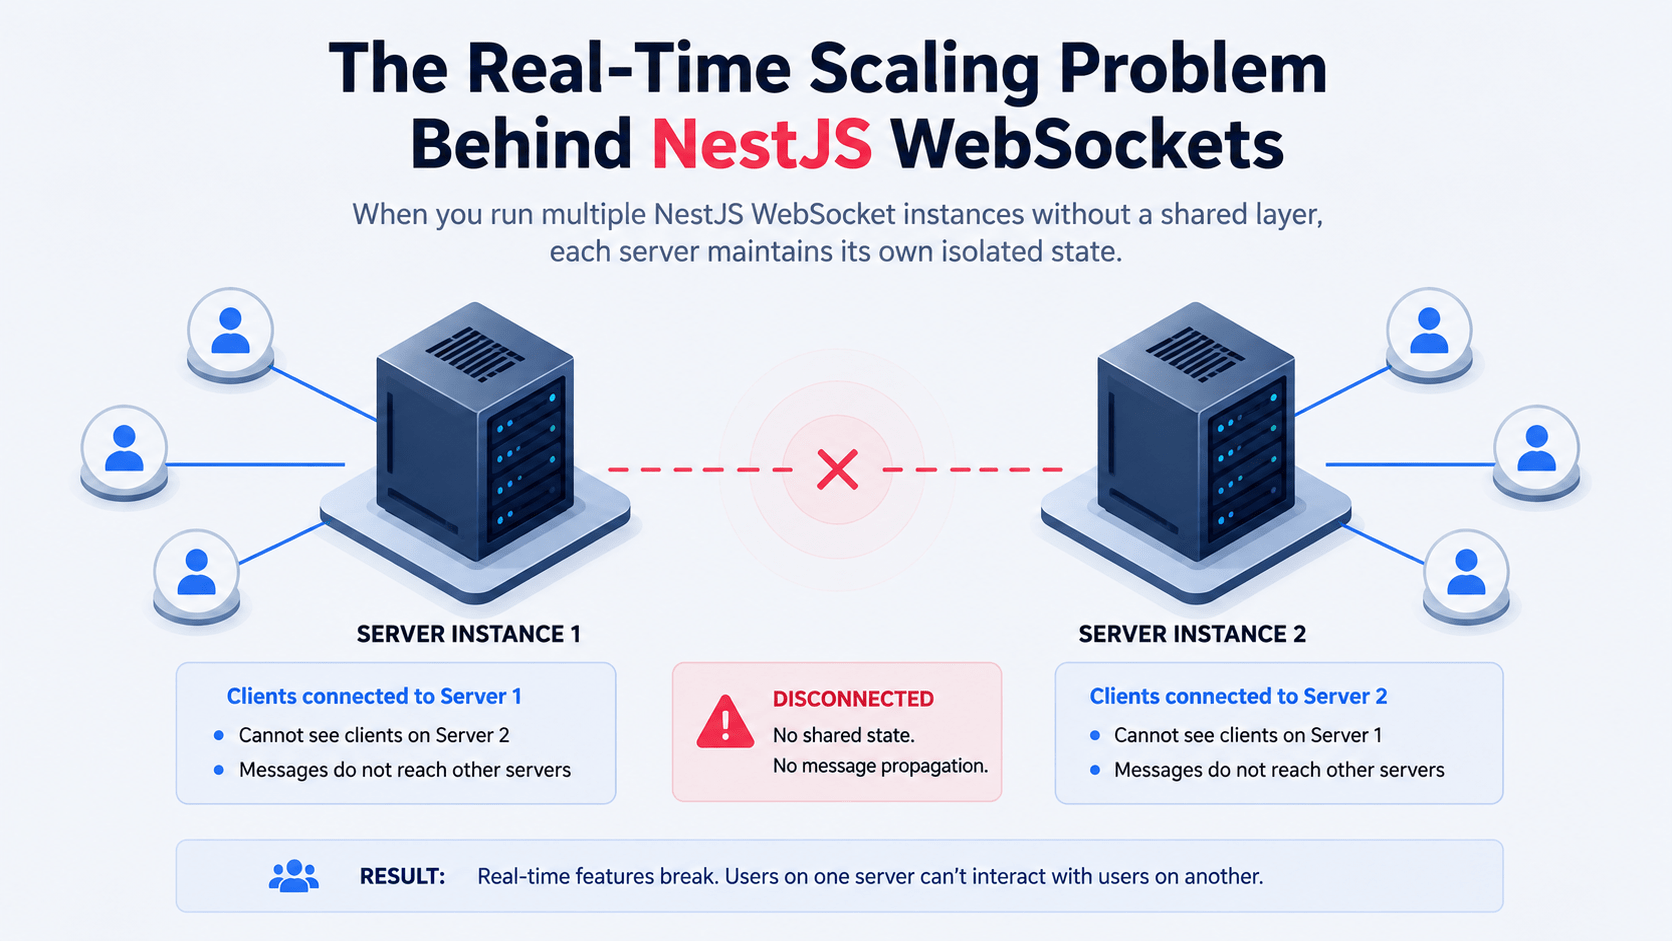
WebSocket connections are stateful that’s the whole problem in one word. A standard single-server deployment keeps an in-memory map of active socket connections, so broadcasting works fine when everyone’s on the same box:
+-----------------------------------------------------------+
|                   Single Server Instance                  |
|  [ Client A ] <---> [ Socket Gateway ] <---> [ Client B ]  |
+-----------------------------------------------------------+
The moment you scale horizontally across multiple container instances in Kubernetes, or behind an AWS ALB that in-memory map fragments. Server A has no native way to emit a message to a client sitting on Server B.
+------------------+                    +------------------+
| Server Instance 1|                    | Server Instance 2|
|    [ Client A ]  |                    |    [ Client B ]  |
+------------------+                    +------------------+
         ^                                       ^
         |--- Server 1 doesn't know about Client B ---|
[IMAGE 1: NestJS WebSockets scaling problem diagram]
The Fix: A Redis Pub/Sub Fanout Layer
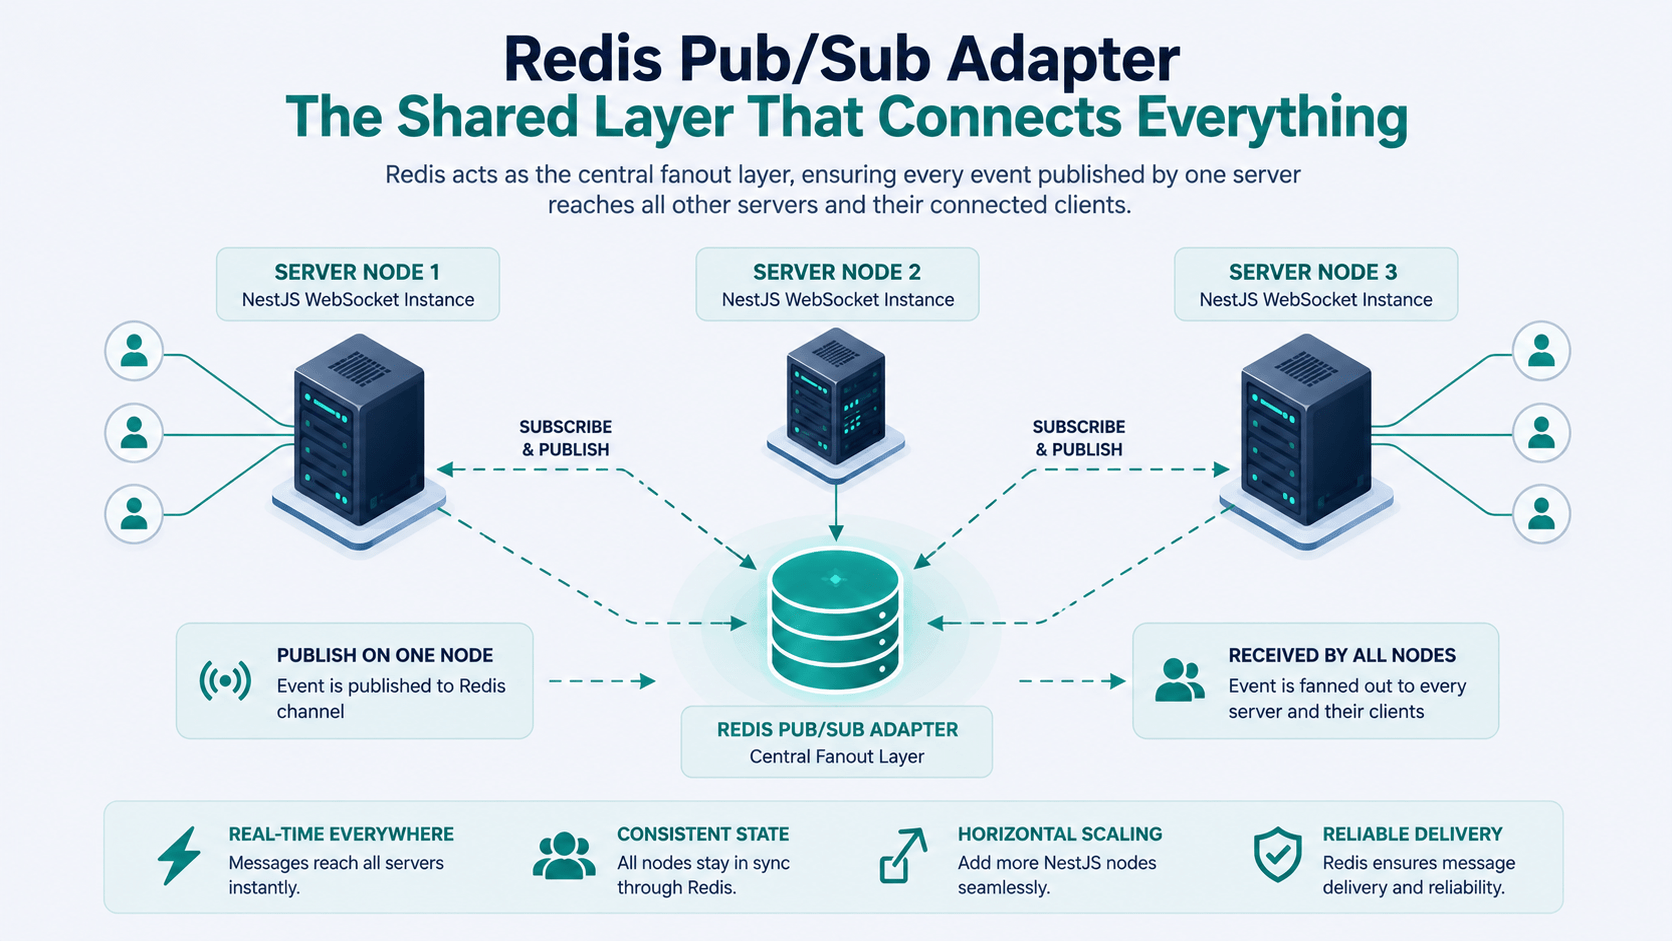
Attach a Redis Pub/Sub adapter to the Socket.io server engine, and every event broadcast gets published to a shared Redis channel instead of staying local. Every server instance subscribes to that channel and forwards the event to whichever clients it happens to have connected.
  [ Client A ]                           [ Client B ]
       ^                                      ^
       | (WebSocket)                          | (WebSocket)
       v                                      v
+------------------+                    +------------------+
| NestJS Server 1  |                    | NestJS Server 2  |
+------------------+                    +------------------+
        \                                      /
         \---- (Publish) ---+--- (Subscribe) -/
                            v
                  +--------------------+
                  |  Redis Memory DB   |
                  |  (Pub/Sub Adapter) |
                  +--------------------+
Installing Dependencies
These are the exact packages a horizontally scaled NestJS WebSockets setup needs install the WebSocket, Socket.io, Redis, and Microservices packages:
npm install @nestjs/websockets @nestjs/platform-socket.io socket.io @socket.io/redis-adapter redis @nestjs/microservices
npm install -D @types/socket.io
Configuring the Custom Redis IoAdapter
To synchronize sockets across multiple nodes, build a custom RedisIoAdapter using @socket.io/redis-adapter and the official Node redis client. This adapter is what actually makes NestJS WebSockets scale past a single instance without it, every server is still an island.
// src/adapters/redis-io.adapter.ts
import { IoAdapter } from '@nestjs/platform-socket.io';
import { ServerOptions } from 'socket.io';
import { createAdapter } from '@socket.io/redis-adapter';
import { createClient } from 'redis';

export class RedisIoAdapter extends IoAdapter {
  private adapterConstructor: ReturnType<typeof createAdapter>;

  async connectToRedis(): Promise<void> {
    const pubClient = createClient({
      url: process.env.REDIS_URL || 'redis://localhost:6379',
    });
    const subClient = pubClient.duplicate();

    await Promise.all([pubClient.connect(), subClient.connect()]);

    this.adapterConstructor = createAdapter(pubClient, subClient);
  }

  override createIOServer(port: number, options?: ServerOptions): any {
    const server = super.createIOServer(port, options);
    server.adapter(this.adapterConstructor);
    return server;
  }
}
Connect the adapter during application bootstrap, inside main.ts:
// src/main.ts
import { NestFactory } from '@nestjs/core';
import { AppModule } from './app.module';
import { RedisIoAdapter } from './adapters/redis-io.adapter';

async function bootstrap() {
  const app = await NestFactory.create(AppModule);

  // Initialize and attach Redis IO Adapter for WebSockets horizontal scaling
  const redisIoAdapter = new RedisIoAdapter(app);
  await redisIoAdapter.connectToRedis();
  app.useWebSocketAdapter(redisIoAdapter);

  await app.listen(3000);
  console.log(`Application running on port 3000`);
}
bootstrap();
[IMAGE 2: Redis IoAdapter connecting two NestJS server nodes]
Building the Real-Time WebSockets Gateway
A NestJS WebSockets Gateway is just an @Injectable() class decorated with @WebSocketGateway(). It can hook into lifecycle events like connections and disconnections, and subscribe to inbound client messages.
// src/events/events.gateway.ts
import {
  WebSocketGateway,
  SubscribeMessage,
  MessageBody,
  WebSocketServer,
  ConnectedSocket,
  OnGatewayInit,
  OnGatewayConnection,
  OnGatewayDisconnect,
} from '@nestjs/websockets';
import { Server, Socket } from 'socket.io';
import { Logger } from '@nestjs/common';

@WebSocketGateway({
  cors: {
    origin: '*', // Set allowed CORS origins for production
  },
  namespace: 'events',
})
export class EventsGateway
  implements OnGatewayInit, OnGatewayConnection, OnGatewayDisconnect
{
  @WebSocketServer()
  server: Server;

  private readonly logger = new Logger(EventsGateway.name);

  afterInit(server: Server) {
    this.logger.log('WebSocket Gateway Initialized');
  }

  handleConnection(client: Socket) {
    this.logger.log(`Client Connected: ${client.id}`);
  }

  handleDisconnect(client: Socket) {
    this.logger.log(`Client Disconnected: ${client.id}`);
  }

  // Subscribe to inbound client events
  @SubscribeMessage('join_room')
  handleJoinRoom(
    @ConnectedSocket() client: Socket,
    @MessageBody() data: { roomId: string },
  ) {
    client.join(data.roomId);
    this.logger.log(`Client ${client.id} joined room: ${data.roomId}`);

    // Broadcast notification to specific room subscribers
    client.to(data.roomId).emit('user_joined', { userId: client.id });
    return { status: 'joined', roomId: data.roomId };
  }

  @SubscribeMessage('send_message')
  handleMessage(
    @ConnectedSocket() client: Socket,
    @MessageBody() payload: { roomId: string; message: string },
  ) {
    // Broadcast event across all connected nodes via Redis Adapter
    this.server.to(payload.roomId).emit('new_message', {
      senderId: client.id,
      message: payload.message,
      timestamp: new Date().toISOString(),
    });
  }
}
Also Read: This gateway assumes you already have a working auth layer protecting who can even open a socket connection. If you haven’t set that up yet, our NestJS Authentication guide covers the dual-token JWT setup this series builds on.
Adding an Event-Driven Microservices Layer with Redis Transport
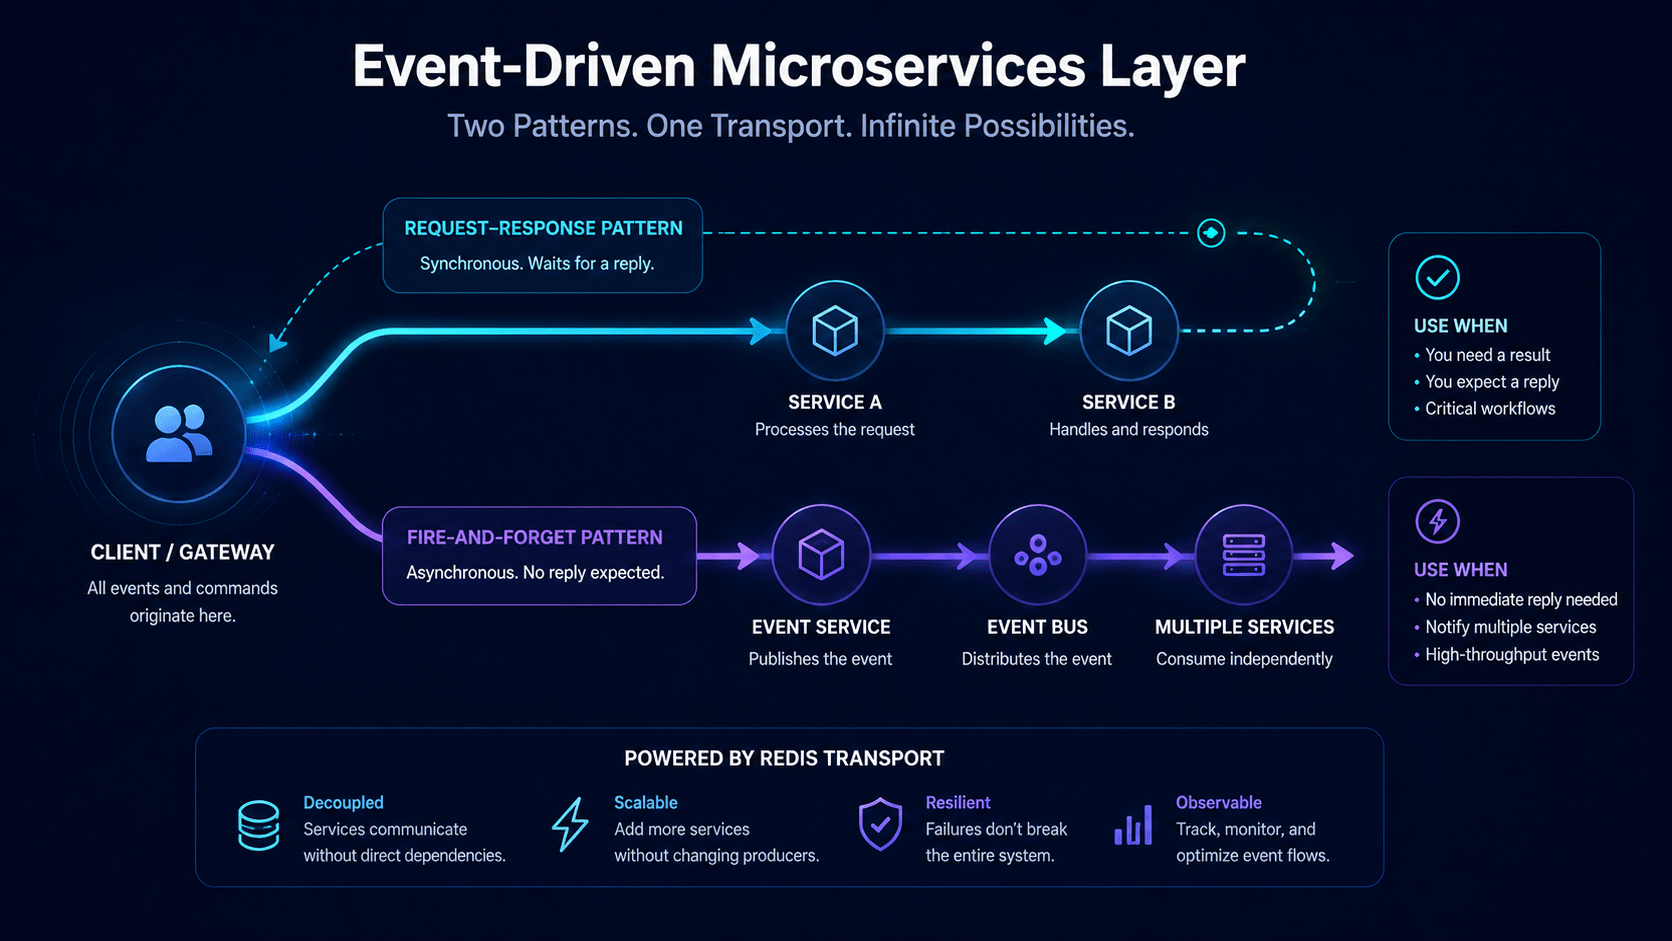
Beyond the WebSocket broadcast adapter, NestJS ships first-class support for a Microservices architecture. You can offload computationally heavy background tasks or event processing using Redis as a transport broker, entirely separate from your HTTP request cycle.
Defining the Microservice Strategy
// src/microservice.ts
import { NestFactory } from '@nestjs/core';
import { Transport, MicroserviceOptions } from '@nestjs/microservices';
import { AppModule } from './app.module';

async function bootstrapMicroservice() {
  const app = await NestFactory.createMicroservice<MicroserviceOptions>(
    AppModule,
    {
      transport: Transport.REDIS,
      options: {
        host: process.env.REDIS_HOST || 'localhost',
        port: Number(process.env.REDIS_PORT) || 6379,
      },
    },
  );

  await app.listen();
  console.log('NestJS Redis Microservice is listening...');
}
bootstrapMicroservice();
Event Handlers and Message Patterns
NestJS Microservices separate Request-Response patterns (@MessagePattern) from Event-Driven, fire-and-forget patterns (@EventPattern) picking the right one matters, since a fire-and-forget event that silently fails is a lot harder to debug than a request that just times out.
// src/notifications/notifications.controller.ts
import { Controller } from '@nestjs/common';
import { EventPattern, MessagePattern, Payload } from '@nestjs/microservices';
import { EventsGateway } from '../events/events.gateway';

export interface UserRegisteredEvent {
  userId: string;
  email: string;
}

@Controller()
export class NotificationsController {
  constructor(private readonly eventsGateway: EventsGateway) {}

  // Fire-and-Forget Event Listener
  @EventPattern('user_created')
  handleUserCreated(@Payload() data: UserRegisteredEvent) {
    console.log(`[Microservice Event Received]: User registered - ${data.email}`);

    // Bridge background microservice events directly into real-time WebSockets
    this.eventsGateway.server.emit('global_notification', {
      type: 'USER_REGISTERED',
      message: `Welcome new user ${data.email}!`,
    });
  }

  // Request-Response Pattern
  @MessagePattern({ cmd: 'calculate_analytics' })
  handleAnalyticsCalculation(@Payload() data: { metricId: string }) {
    return { metricId: data.metricId, result: 99.42, calculatedAt: new Date() };
  }
}
[IMAGE 3: Event-driven microservice bridging into a WebSocket gateway]
Wiring the End-to-End Real-Time Event Pipeline
To emit microservice events from an HTTP controller or service, inject the ClientProxy transport service. This is the piece that connects a normal REST request to the real-time layer without the controller ever touching a socket directly.
// src/users/users.module.ts
import { Module } from '@nestjs/common';
import { ClientsModule, Transport } from '@nestjs/microservices';
import { UsersController } from './users.controller';
import { UsersService } from './users.service';

@Module({
  imports: [
    ClientsModule.register([
      {
        name: 'NOTIFICATIONS_SERVICE',
        transport: Transport.REDIS,
        options: {
          host: process.env.REDIS_HOST || 'localhost',
          port: Number(process.env.REDIS_PORT) || 6379,
        },
      },
    ]),
  ],
  controllers: [UsersController],
  providers: [UsersService],
})
export class UsersModule {}
// src/users/users.service.ts
import { Injectable, Inject } from '@nestjs/common';
import { ClientProxy } from '@nestjs/microservices';

@Injectable()
export class UsersService {
  constructor(
    @Inject('NOTIFICATIONS_SERVICE') private readonly client: ClientProxy,
  ) {}

  async createUser(email: string) {
    const newUser = { id: 'usr_' + Date.now(), email };

    // Publish asynchronous event to Redis pub/sub broker
    this.client.emit('user_created', {
      userId: newUser.id,
      email: newUser.email,
    });

    return newUser;
  }
}
Key Takeaways for Scaling NestJS WebSockets
- Stateful vs. stateless scaling: persistent WebSocket channels need a synchronization layer across server nodes a load balancer alone won’t fix it.
- Redis IoAdapter:
@socket.io/redis-adapterfans Socket.io room events out to every active NestJS replica, so it doesn’t matter which node a client landed on. - Event-driven separation:
@EventPattern()and@SubscribeMessage()cleanly split background microservice work from real-time client communication. - End-to-end synergy: pairing NestJS Microservices (
ClientProxy) with WebSockets lets async backend pipelines push live updates straight to a React or Next.js frontend.
Why NestJS WebSockets Need Redis, Not Just a Load Balancer
A load balancer solves which server a request goes to it doesn’t solve the fact that Server A and Server B still don’t know about each other’s open socket connections. Redis Pub/Sub is the missing shared memory layer: it’s not optional infrastructure for scaled NestJS WebSockets, it’s the thing that makes horizontal scaling actually work instead of silently dropping messages for half your users.
What’s Next
With this NestJS backend series now covering authentication, database layers, and real-time scaling, the next tracks branch two ways: Production Testing & Observability for full-stack apps (Vitest, Playwright, Sentry), or Python & AI/ML infrastructure for JavaScript engineers (FastAPI, PyTorch, LangChain integration).