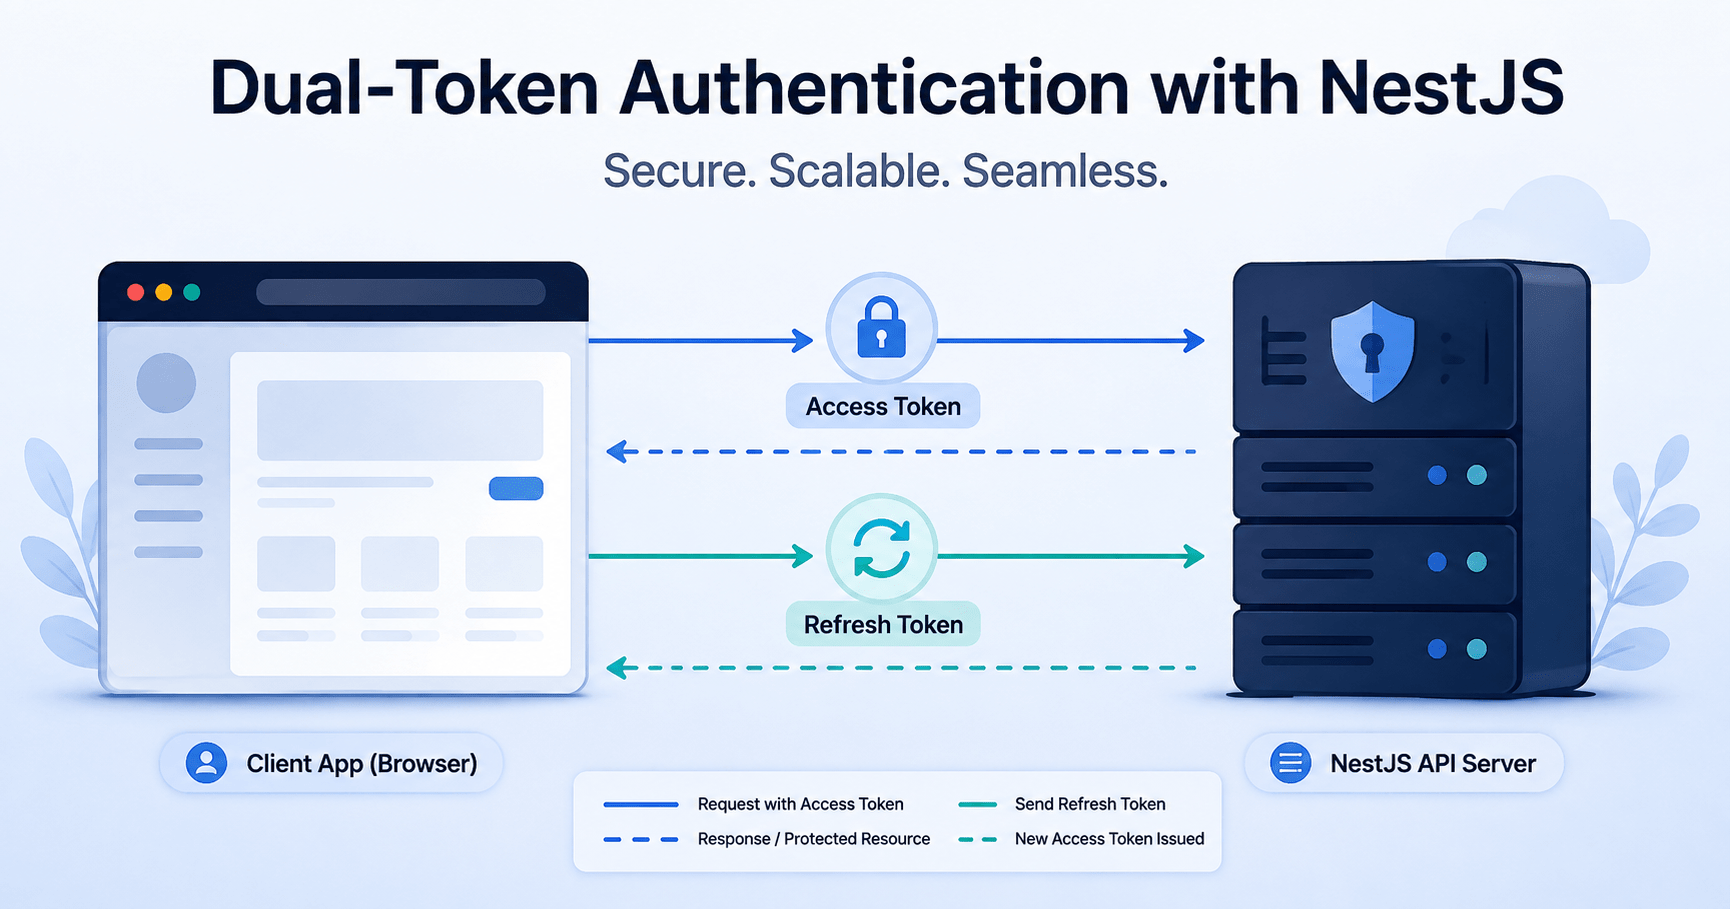

If you’ve shipped a proof-of-concept with a JWT sitting in localStorage, you already know it doesn’t survive contact with production. Real NestJS authentication needs a system that assumes tokens will leak, sessions will get replayed, and someone will eventually try to reuse a stolen refresh token against you.
This post walks through building a production-ready authentication subsystem in NestJS using @nestjs/passport, @nestjs/jwt, bcrypt, and an industry-standard dual-token system short-lived access tokens paired with long-lived, rotating refresh tokens. It’s Blog Post 33 in our NestJS series; if you haven’t set up your database layer yet, start with our NestJS Prisma and PostgreSQL setup guide first, since this post builds directly on that schema.
What “Production-Ready” NestJS Authentication Actually Means
Most tutorials stop at “sign a JWT and call it done.” That’s fine for a weekend project, but it leaves you exposed to Cross-Site Scripting (XSS) payload extraction, silent replay attacks, and sessions that never actually expire when they should.
A production NestJS authentication setup separates tokens by longevity and storage layer, so a compromised token has a short blast radius instead of a permanent one.
Also Read: Curious how NestJS stacks up against a frontend-first framework for your next build? Our Next.js vs NestJS comparison breaks down exactly when to reach for each one including why NestJS wraps Passport.js strategies as the standard for JWT-guarded REST endpoints.
1. High-Level Architecture: How Dual-Token Authentication Works
Modern NestJS authentication splits identity proof into two tokens with very different jobs:
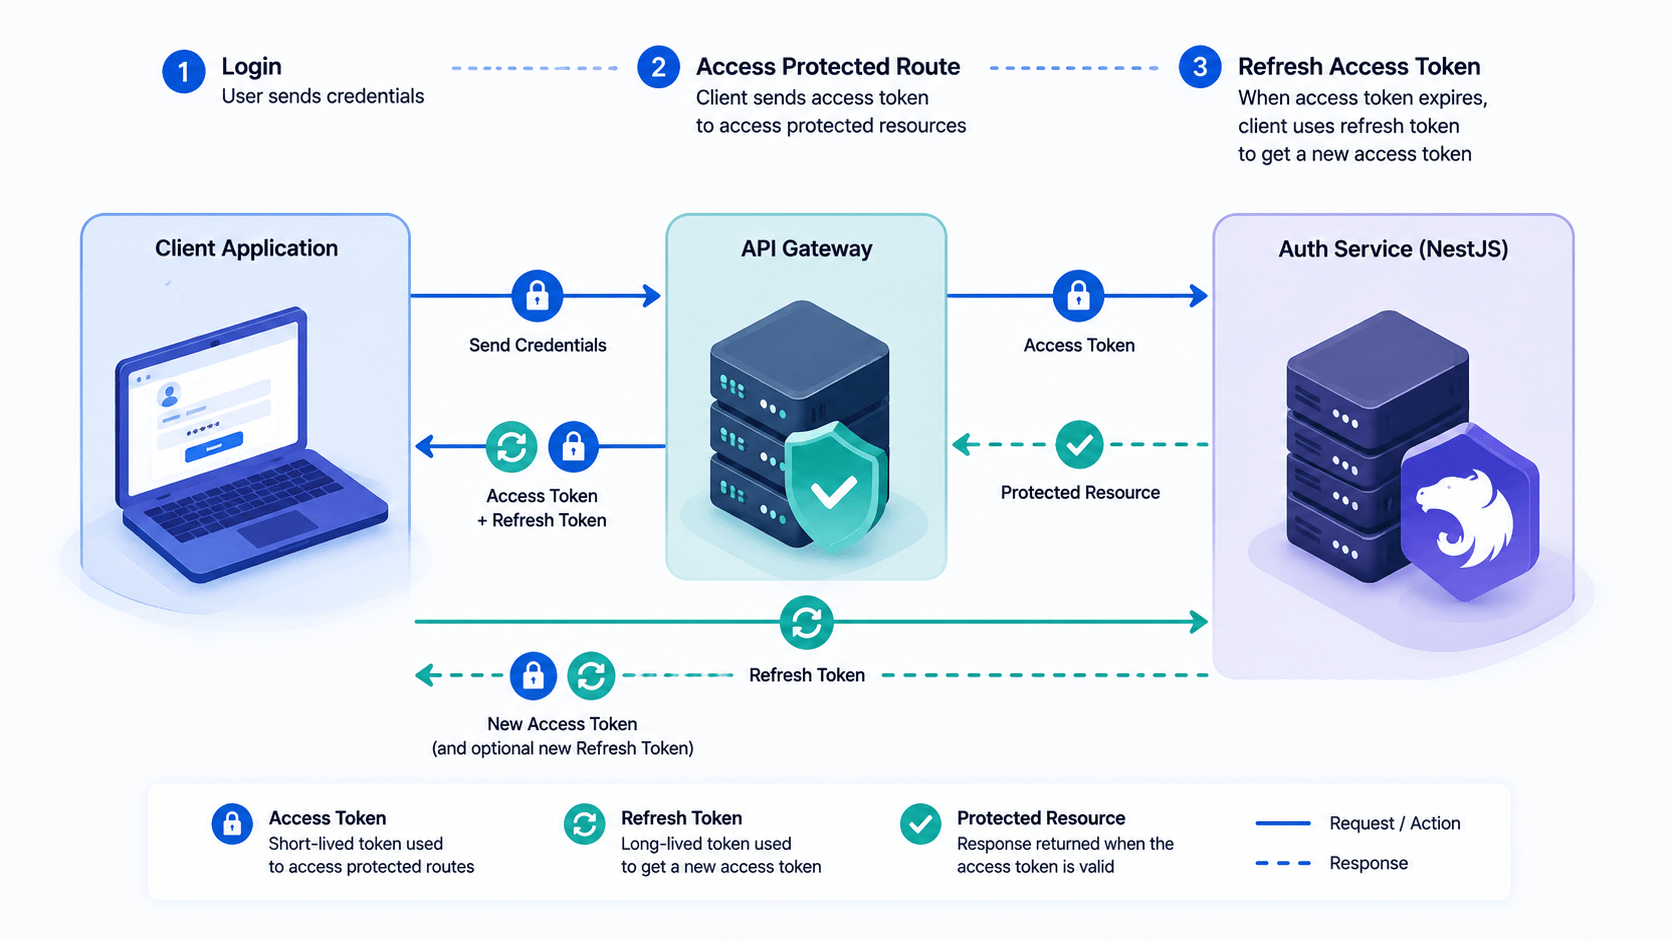
- Short-lived access token (e.g., 15-minute expiry): sent via the
Authorization: Bearer <token>header. It authenticates fast, frequent API calls. - Long-lived refresh token (e.g., 7-day expiry): stored in an
HttpOnly,SameSite=Strict,Securecookie. Its only job is requesting a new access token once the old one expires. - Token rotation and hashing: refresh tokens are hashed with bcrypt and stored in PostgreSQL via Prisma. Every refresh issues a brand-new pair and overwrites the stored hash. If a compromised refresh token gets reused, every session tied to that user is invalidated.
[IMAGE 1: Dual-token authentication flow diagram]
+----------------+          1. POST /auth/login           +------------------+
|                | -------------------------------------> |                  |
|                | <------------------------------------- |                  |
|                |  2. Returns Access Token (JSON)        |                  |
|   Client App   |     + Set HttpOnly Cookie (Refresh)    |  NestJS Backend  |
|  (React/Next)  |                                        |   (Passport +    |
|                |          3. GET /protected             |     Prisma)      |
|                |   (Header: Bearer <Access_Token>)      |                  |
|                | -------------------------------------> |                  |
+----------------+                                        +------------------+
2. Installing Dependencies
These are the exact packages a working NestJS authentication setup depends on install the NestJS and Passport ecosystem packages you’ll need:
npm install @nestjs/passport passport passport-local passport-jwt @nestjs/jwt bcrypt
npm install -D @types/passport-local @types/passport-jwt @types/bcrypt
3. Database Schema (Prisma)
This schema is the backbone every NestJS authentication flow in this guide depends on. Update schema.prisma to support credentials and refresh token hashes:
// prisma/schema.prisma

model User {
  id               String   @id @default(uuid())
  email            String   @unique
  passwordHash     String
  hashedRefreshToken String?
  createdAt        DateTime @default(now())
  updatedAt        DateTime @updatedAt
}
Run the migration:
npx prisma migrate dev --name add_auth_fields
If this schema.prisma setup looks unfamiliar, that’s the piece our Prisma and PostgreSQL guide covers step by step worth a detour before continuing.
4. Password Security Service (Bcrypt)
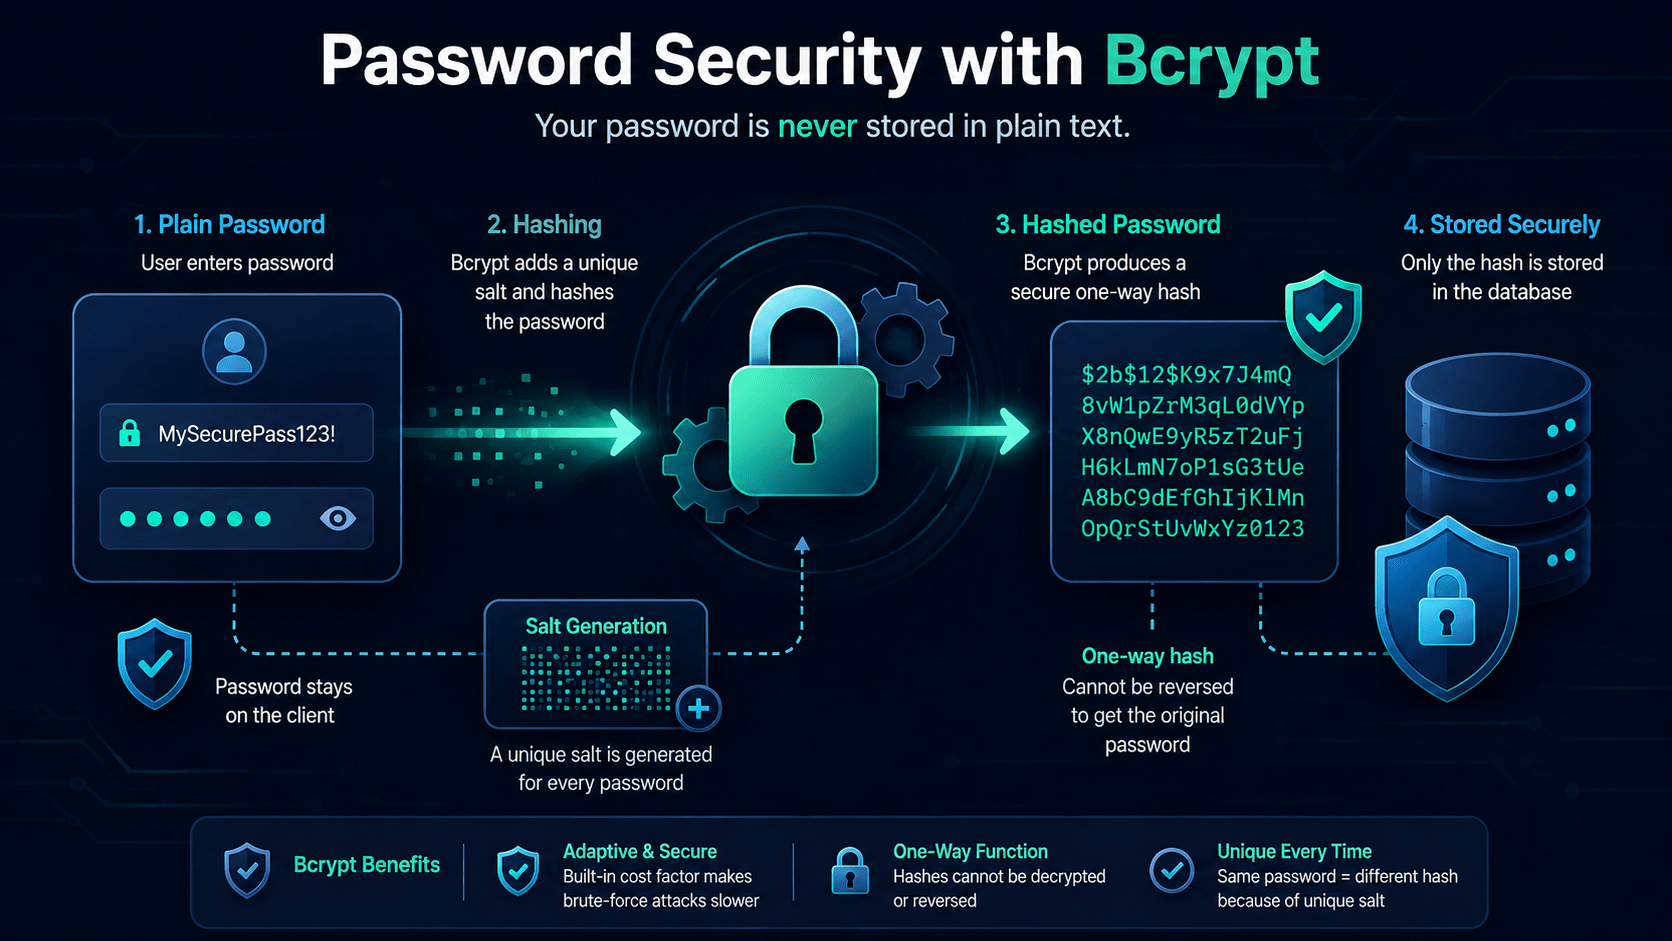
Bcrypt is the piece of NestJS authentication that protects credentials at rest, so always isolate cryptographic hashing into its own utility rather than duplicating it inline:
// src/auth/utils/hash.util.ts
import * as bcrypt from 'bcrypt';

export class HashUtil {
  private static readonly SALT_ROUNDS = 12;

  static async hashData(data: string): Promise<string> {
    return bcrypt.hash(data, this.SALT_ROUNDS);
  }

  static async compareData(data: string, hash: string): Promise<boolean> {
    return bcrypt.compare(data, hash);
  }
}
[IMAGE 2: Bcrypt password hashing lifecycle]
5. Passport Strategies for NestJS Authentication
Passport abstracts the actual authentication mechanics into discrete, swappable strategies. This setup needs two:
JwtStrategy-validates short-lived access tokens from theAuthorizationheader.JwtRefreshStrategy– validates long-lived refresh tokens from cookies (falling back to a header).
Access Token Strategy (JwtStrategy)
// src/auth/strategies/jwt.strategy.ts
import { Injectable, UnauthorizedException } from '@nestjs/common';
import { PassportStrategy } from '@nestjs/passport';
import { ExtractJwt, Strategy } from 'passport-jwt';

export interface JwtPayload {
  sub: string;
  email: string;
}

@Injectable()
export class JwtStrategy extends PassportStrategy(Strategy, 'jwt') {
  constructor() {
    super({
      jwtFromRequest: ExtractJwt.fromAuthHeaderAsBearerToken(),
      ignoreExpiration: false,
      secretOrKey: process.env.JWT_ACCESS_SECRET || 'super-secret-access-key',
    });
  }

  async validate(payload: JwtPayload) {
    if (!payload.sub) {
      throw new UnauthorizedException('Invalid token payload');
    }
    return { userId: payload.sub, email: payload.email };
  }
}
Refresh Token Strategy (JwtRefreshStrategy)
// src/auth/strategies/jwt-refresh.strategy.ts
import { Injectable, ForbiddenException } from '@nestjs/common';
import { PassportStrategy } from '@nestjs/passport';
import { ExtractJwt, Strategy } from 'passport-jwt';
import { Request } from 'express';

@Injectable()
export class JwtRefreshStrategy extends PassportStrategy(Strategy, 'jwt-refresh') {
  constructor() {
    super({
      jwtFromRequest: ExtractJwt.fromExtractors([
        (req: Request) => req?.cookies?.refreshToken || ExtractJwt.fromAuthHeaderAsBearerToken()(req),
      ]),
      ignoreExpiration: false,
      secretOrKey: process.env.JWT_REFRESH_SECRET || 'super-secret-refresh-key',
      passReqToCallback: true,
    });
  }

  async validate(req: Request, payload: any) {
    const refreshToken = req?.cookies?.refreshToken || req.get('Authorization')?.replace('Bearer', '').trim();

    if (!refreshToken) {
      throw new ForbiddenException('Refresh token missing');
    }

    return {
      userId: payload.sub,
      email: payload.email,
      refreshToken,
    };
  }
}
6. Guards and Metadata Decorators
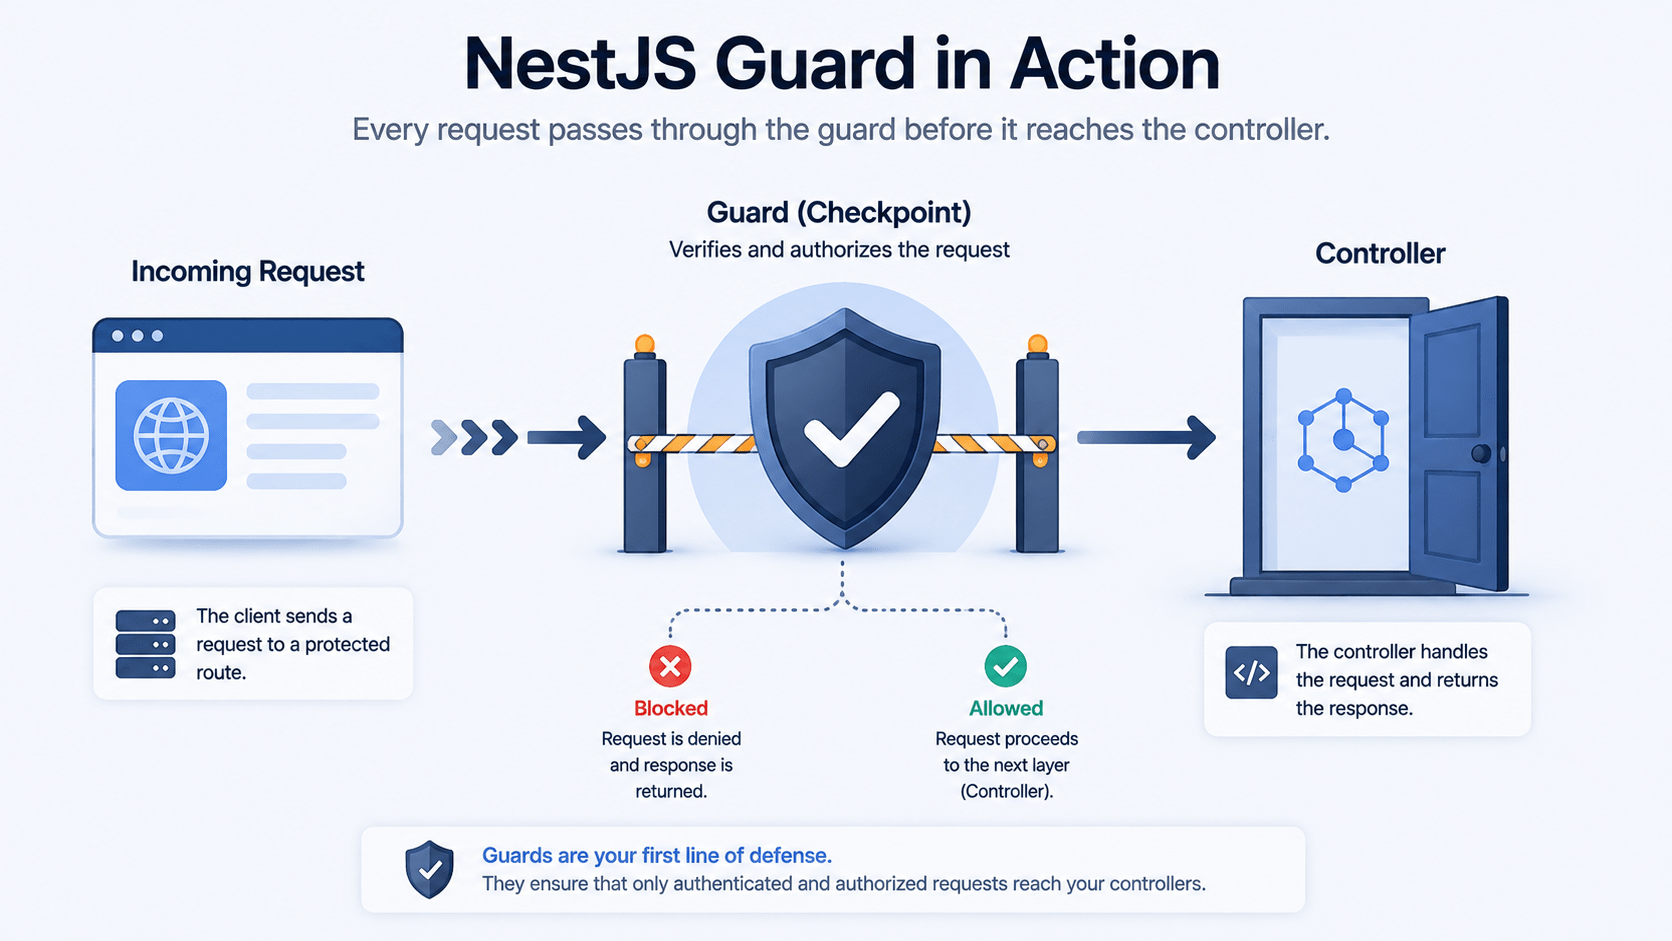
NestJS uses Guards to intercept incoming requests before they reach a controller handler this is where NestJS authentication actually gets enforced, and where routes get locked down or waved through.
Custom @Public() Decorator
Every route should be protected by default, unless it’s explicitly marked public:
// src/auth/decorators/public.decorator.ts
import { SetMetadata } from '@nestjs/common';

export const IS_PUBLIC_KEY = 'isPublic';
export const Public = () => SetMetadata(IS_PUBLIC_KEY, true);
Dynamic JWT Auth Guard
// src/auth/guards/jwt-auth.guard.ts
import { ExecutionContext, Injectable } from '@nestjs/common';
import { Reflector } from '@nestjs/core';
import { AuthGuard } from '@nestjs/passport';
import { IS_PUBLIC_KEY } from '../decorators/public.decorator';

@Injectable()
export class JwtAuthGuard extends AuthGuard('jwt') {
  constructor(private reflector: Reflector) {
    super();
  }

  canActivate(context: ExecutionContext) {
    const isPublic = this.reflector.getAllAndOverride<boolean>(IS_PUBLIC_KEY, [
      context.getHandler(),
      context.getClass(),
    ]);

    if (isPublic) {
      return true;
    }

    return super.canActivate(context);
  }
}
Refresh Token Guard
// src/auth/guards/jwt-refresh.guard.ts
import { Injectable } from '@nestjs/common';
import { AuthGuard } from '@nestjs/passport';

@Injectable()
export class JwtRefreshGuard extends AuthGuard('jwt-refresh') {}
Custom Parameter Decorator: @CurrentUser
Pull the authenticated user straight into a controller parameter, instead of reaching into request.user manually every time:
// src/auth/decorators/current-user.decorator.ts
import { createParamDecorator, ExecutionContext } from '@nestjs/common';

export const CurrentUser = createParamDecorator(
  (data: string | undefined, ctx: ExecutionContext) => {
    const request = ctx.switchToHttp().getRequest();
    if (!data) return request.user;
    return request.user?.[data];
  },
);
[IMAGE 3: NestJS guard request lifecycle]
7. Authentication Service Core Logic
AuthService owns registration, credential verification, token generation, and secure token rotation all the actual business logic behind NestJS authentication lives here, not in the controller.
// src/auth/auth.service.ts
import { Injectable, ForbiddenException, ConflictException, UnauthorizedException } from '@nestjs/common';
import { JwtService } from '@nestjs/jwt';
import { PrismaService } from '../prisma/prisma.service';
import { HashUtil } from './utils/hash.util';
import { RegisterDto, LoginDto } from './dto/auth.dto';

@Injectable()
export class AuthService {
  constructor(
    private prisma: PrismaService,
    private jwtService: JwtService,
  ) {}

  async register(dto: RegisterDto) {
    const existing = await this.prisma.user.findUnique({ where: { email: dto.email } });
    if (existing) throw new ConflictException('Email already in use');

    const passwordHash = await HashUtil.hashData(dto.password);
    const newUser = await this.prisma.user.create({
      data: {
        email: dto.email,
        passwordHash,
      },
    });

    const tokens = await this.getTokens(newUser.id, newUser.email);
    await this.updateRefreshTokenHash(newUser.id, tokens.refreshToken);
    return tokens;
  }

  async login(dto: LoginDto) {
    const user = await this.prisma.user.findUnique({ where: { email: dto.email } });
    if (!user) throw new UnauthorizedException('Invalid credentials');

    const passwordMatches = await HashUtil.compareData(dto.password, user.passwordHash);
    if (!passwordMatches) throw new UnauthorizedException('Invalid credentials');

    const tokens = await this.getTokens(user.id, user.email);
    await this.updateRefreshTokenHash(user.id, tokens.refreshToken);
    return tokens;
  }

  async logout(userId: string) {
    await this.prisma.user.update({
      where: { id: userId },
      data: { hashedRefreshToken: null },
    });
  }

  async refreshTokens(userId: string, refreshToken: string) {
    const user = await this.prisma.user.findUnique({ where: { id: userId } });
    if (!user || !user.hashedRefreshToken) throw new ForbiddenException('Access Denied');

    const refreshTokenMatches = await HashUtil.compareData(refreshToken, user.hashedRefreshToken);
    if (!refreshTokenMatches) throw new ForbiddenException('Access Denied - Security Flag Triggered');

    const tokens = await this.getTokens(user.id, user.email);
    await this.updateRefreshTokenHash(user.id, tokens.refreshToken);
    return tokens;
  }

  private async updateRefreshTokenHash(userId: string, refreshToken: string) {
    const hash = await HashUtil.hashData(refreshToken);
    await this.prisma.user.update({
      where: { id: userId },
      data: { hashedRefreshToken: hash },
    });
  }

  private async getTokens(userId: string, email: string) {
    const [accessToken, refreshToken] = await Promise.all([
      this.jwtService.signAsync(
        { sub: userId, email },
        { secret: process.env.JWT_ACCESS_SECRET || 'super-secret-access-key', expiresIn: '15m' },
      ),
      this.jwtService.signAsync(
        { sub: userId, email },
        { secret: process.env.JWT_REFRESH_SECRET || 'super-secret-refresh-key', expiresIn: '7d' },
      ),
    ]);

    return { accessToken, refreshToken };
  }
}
8. Auth Controller and Cookie Handling
This is where NestJS authentication meets the HTTP layer routes stay thin, since all the real logic already lives in AuthService.
// src/auth/auth.controller.ts
import { Controller, Post, Body, HttpCode, HttpStatus, UseGuards, Res } from '@nestjs/common';
import { Response } from 'express';
import { AuthService } from './auth.service';
import { RegisterDto, LoginDto } from './dto/auth.dto';
import { Public } from './decorators/public.decorator';
import { CurrentUser } from './decorators/current-user.decorator';
import { JwtRefreshGuard } from './guards/jwt-refresh.guard';

@Controller('auth')
export class AuthController {
  constructor(private authService: AuthService) {}

  private setCookie(res: Response, refreshToken: string) {
    res.cookie('refreshToken', refreshToken, {
      httpOnly: true,
      secure: process.env.NODE_ENV === 'production',
      sameSite: 'strict',
      maxAge: 7 * 24 * 60 * 60 * 1000, // 7 days
    });
  }

  @Public()
  @Post('register')
  @HttpCode(HttpStatus.CREATED)
  async register(@Body() dto: RegisterDto, @Res({ passthrough: true }) res: Response) {
    const tokens = await this.authService.register(dto);
    this.setCookie(res, tokens.refreshToken);
    return { accessToken: tokens.accessToken };
  }

  @Public()
  @Post('login')
  @HttpCode(HttpStatus.OK)
  async login(@Body() dto: LoginDto, @Res({ passthrough: true }) res: Response) {
    const tokens = await this.authService.login(dto);
    this.setCookie(res, tokens.refreshToken);
    return { accessToken: tokens.accessToken };
  }

  @Post('logout')
  @HttpCode(HttpStatus.OK)
  async logout(@CurrentUser('userId') userId: string, @Res({ passthrough: true }) res: Response) {
    await this.authService.logout(userId);
    res.clearCookie('refreshToken');
    return { message: 'Logged out successfully' };
  }

  @Public()
  @UseGuards(JwtRefreshGuard)
  @Post('refresh')
  @HttpCode(HttpStatus.OK)
  async refreshTokens(
    @CurrentUser('userId') userId: string,
    @CurrentUser('refreshToken') refreshToken: string,
    @Res({ passthrough: true }) res: Response,
  ) {
    const tokens = await this.authService.refreshTokens(userId, refreshToken);
    this.setCookie(res, tokens.refreshToken);
    return { accessToken: tokens.accessToken };
  }
}
9. Registering the AuthModule Globally
// src/auth/auth.module.ts
import { Module } from '@nestjs/common';
import { JwtModule } from '@nestjs/jwt';
import { APP_GUARD } from '@nestjs/core';
import { AuthService } from './auth.service';
import { AuthController } from './auth.controller';
import { JwtStrategy } from './strategies/jwt.strategy';
import { JwtRefreshStrategy } from './strategies/jwt-refresh.strategy';
import { JwtAuthGuard } from './guards/jwt-auth.guard';

@Module({
  imports: [JwtModule.register({})],
  controllers: [AuthController],
  providers: [
    AuthService,
    JwtStrategy,
    JwtRefreshStrategy,
    {
      provide: APP_GUARD,
      useClass: JwtAuthGuard,
    },
  ],
})
export class AuthModule {}
10. Key Takeaways for Secure NestJS Authentication
Here’s what actually makes this NestJS authentication setup production-grade rather than a demo:
- Dual-token system: short-lived access tokens shrink the attack window; long-lived refresh tokens keep the user experience seamless.
- HttpOnly cookie storage: keeps refresh tokens out of reach of client-side scripts, closing off the most common XSS extraction path.
- Token rotation: every refresh revokes the old token and stores a fresh hash, which is what actually stops replay attacks not just token expiry.
- Guards and metadata decorators:
@Public()and@CurrentUser()keep controllers declarative, readable, and locked down by default.
Why This NestJS Authentication Setup Resists Replay Attacks
The part most tutorials skip is what happens after a refresh token leaks. Because every refresh call rotates the stored hash, a stolen token only works once the next legitimate refresh (or the attacker’s second attempt) fails the hash comparison and can trigger a full session wipe for that user. That single design choice is what separates a demo from something you’d actually deploy.
What’s Next
Blog Post 34 in this series scales this NestJS application horizontally, covering Microservices and Real-Time Architecture with WebSockets, Redis Pub/Sub, and Event Gateways.