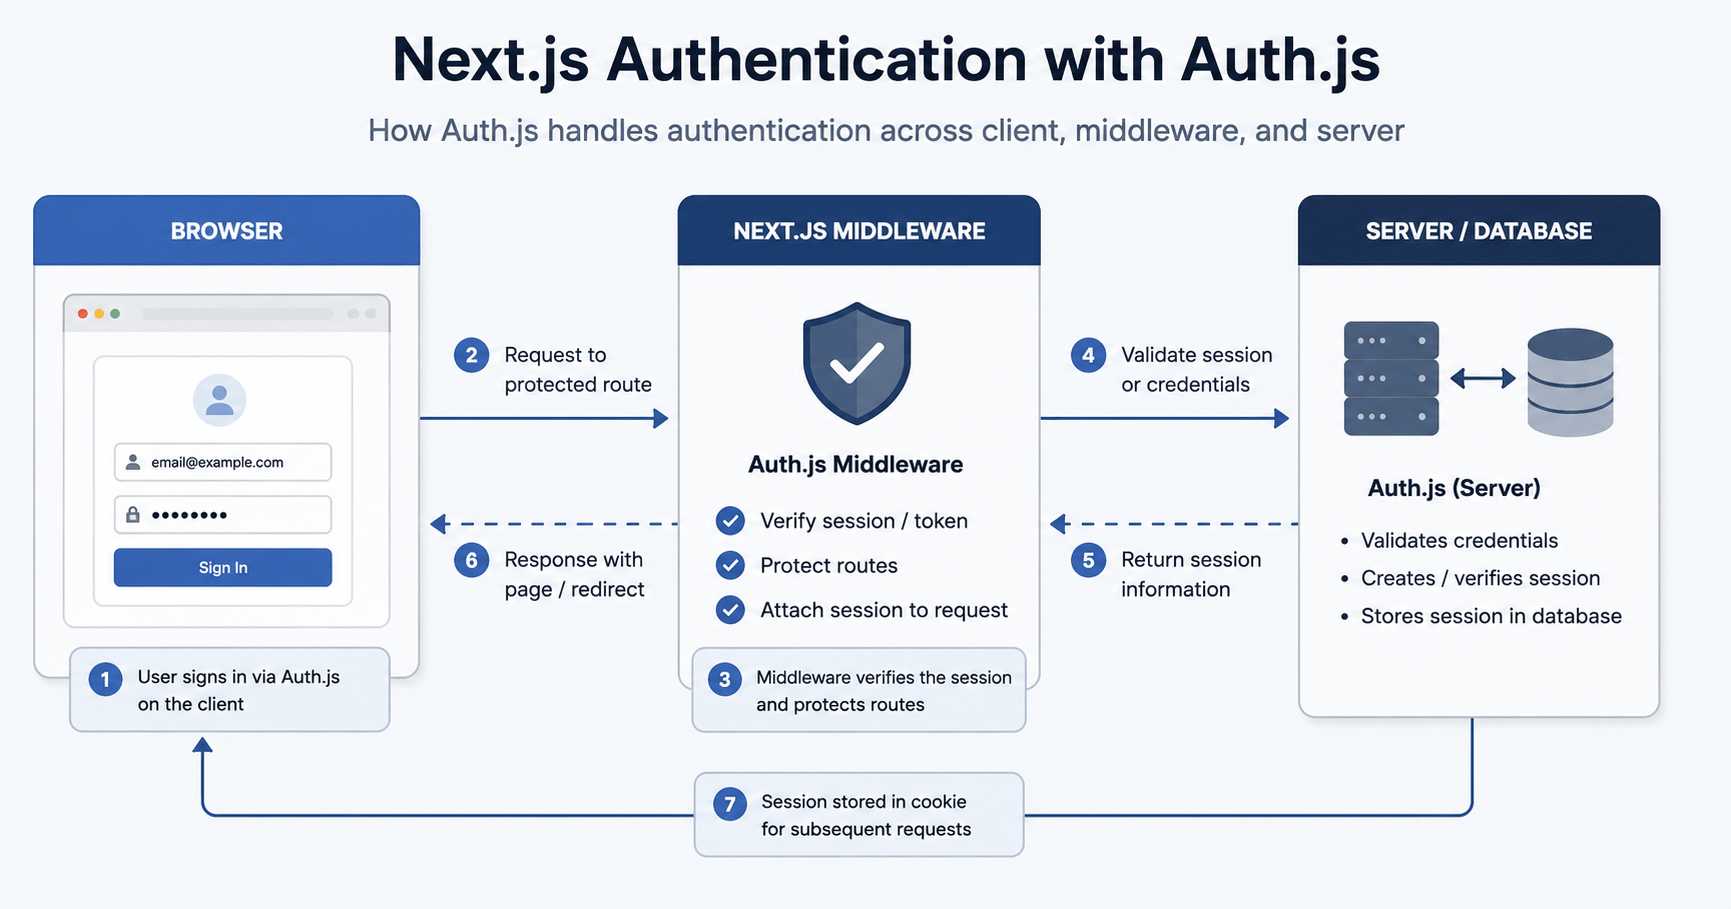

Next.js authentication is one of the most important things to get right as a full-stack developer. Whether you’re protecting an admin panel, personalizing a user dashboard, or gating content behind a paywall, you need a system that handles logins, sessions, and route authorization securely.
Building Next.js authentication from scratch means handling password hashing, CSRF tokens, OAuth flows, and cookie encryption yourself. A single mistake in any of these can turn into a serious security vulnerability, and that’s exactly why most developers reach for a battle-tested library instead of rolling their own.
In the Next.js ecosystem, the standard solution for Next.js authentication is Auth.js (formerly NextAuth.js). Built specifically for App Router architecture, Auth.js handles OAuth providers like GitHub and Google, passwordless magic links, and custom credentials right out of the box.
In this guide, we’ll set up Next.js authentication with Auth.js and protect application routes using Next.js Middleware, in five easy steps.
What You’ll Need Before You Start Next.js Authentication
- A Next.js 14 or 15 project using the App Router (see our React and Next.js framework introduction if you’re choosing a framework for the first time)
- Node.js 18.18 or later installed
- A GitHub OAuth App (or another provider’s credentials) for testing login
- Basic familiarity with Server Components and Server Actions
How Next.js Authentication Works with Auth.js
Auth.js sits between client interactions, Next.js Middleware, and your backend session store or database, acting as the Next.js authentication layer for your entire app.
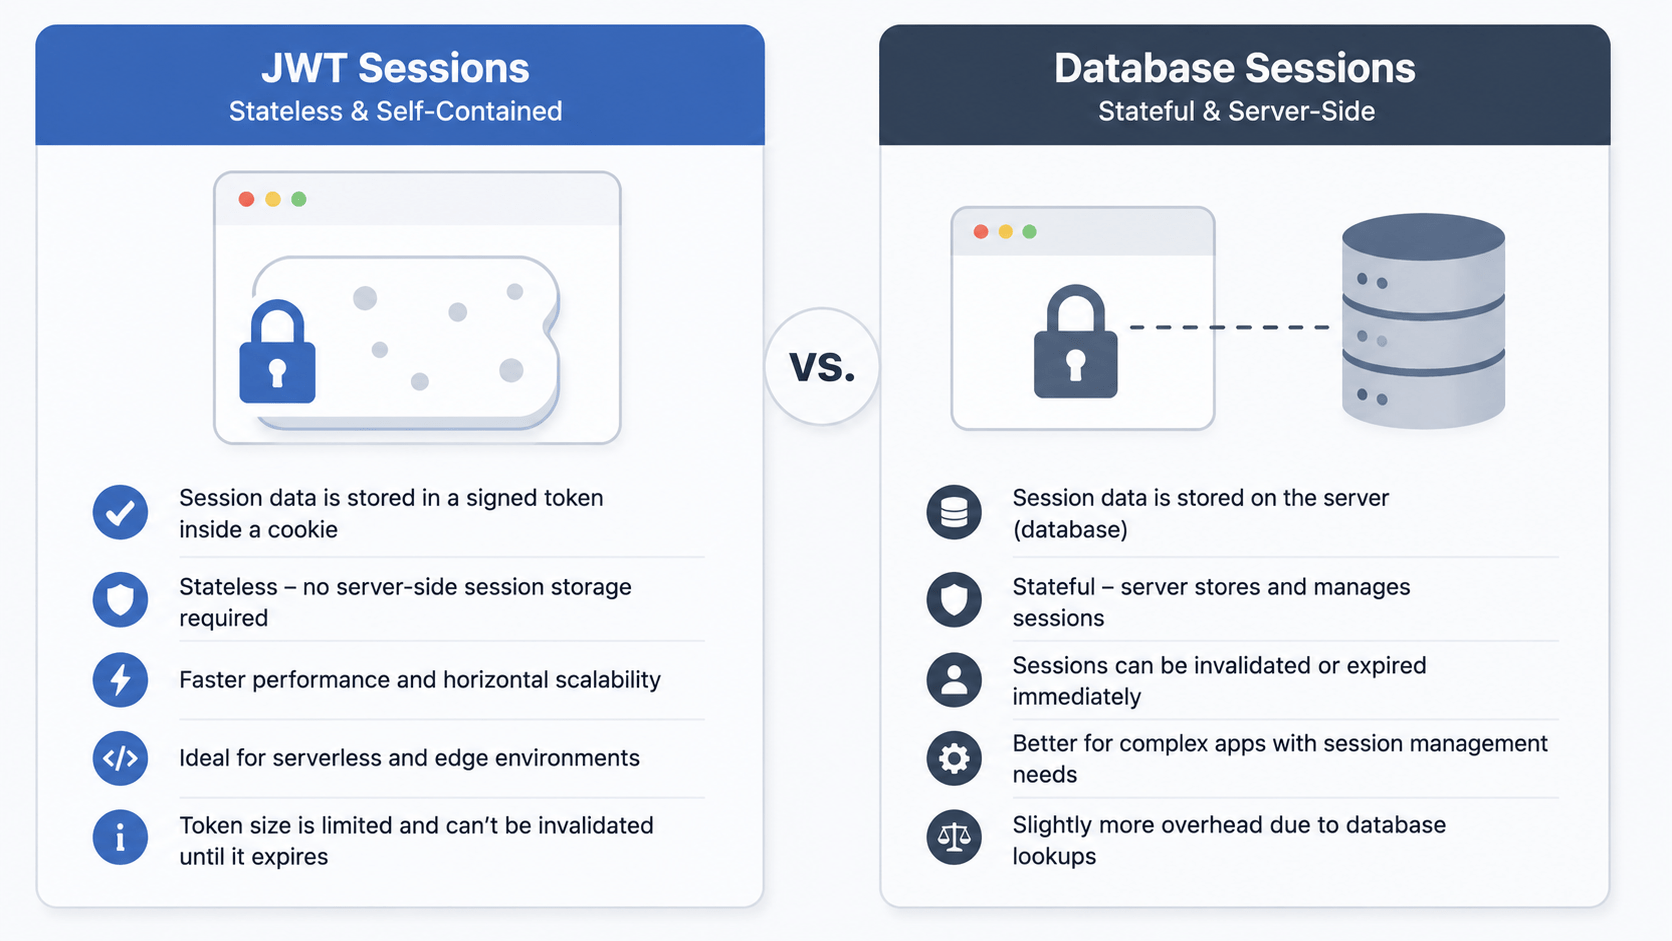
Three concepts matter most when you’re learning Next.js authentication with Auth.js:
- OAuth Providers authenticate users through external services like GitHub or Google, so your app never touches or stores their password.
- JWT vs. Database Sessions — Auth.js defaults to JSON Web Tokens stored in encrypted, HTTP-only cookies. That keeps session checks fast enough to run on the edge, though you can switch to database sessions if you need instant revocation.
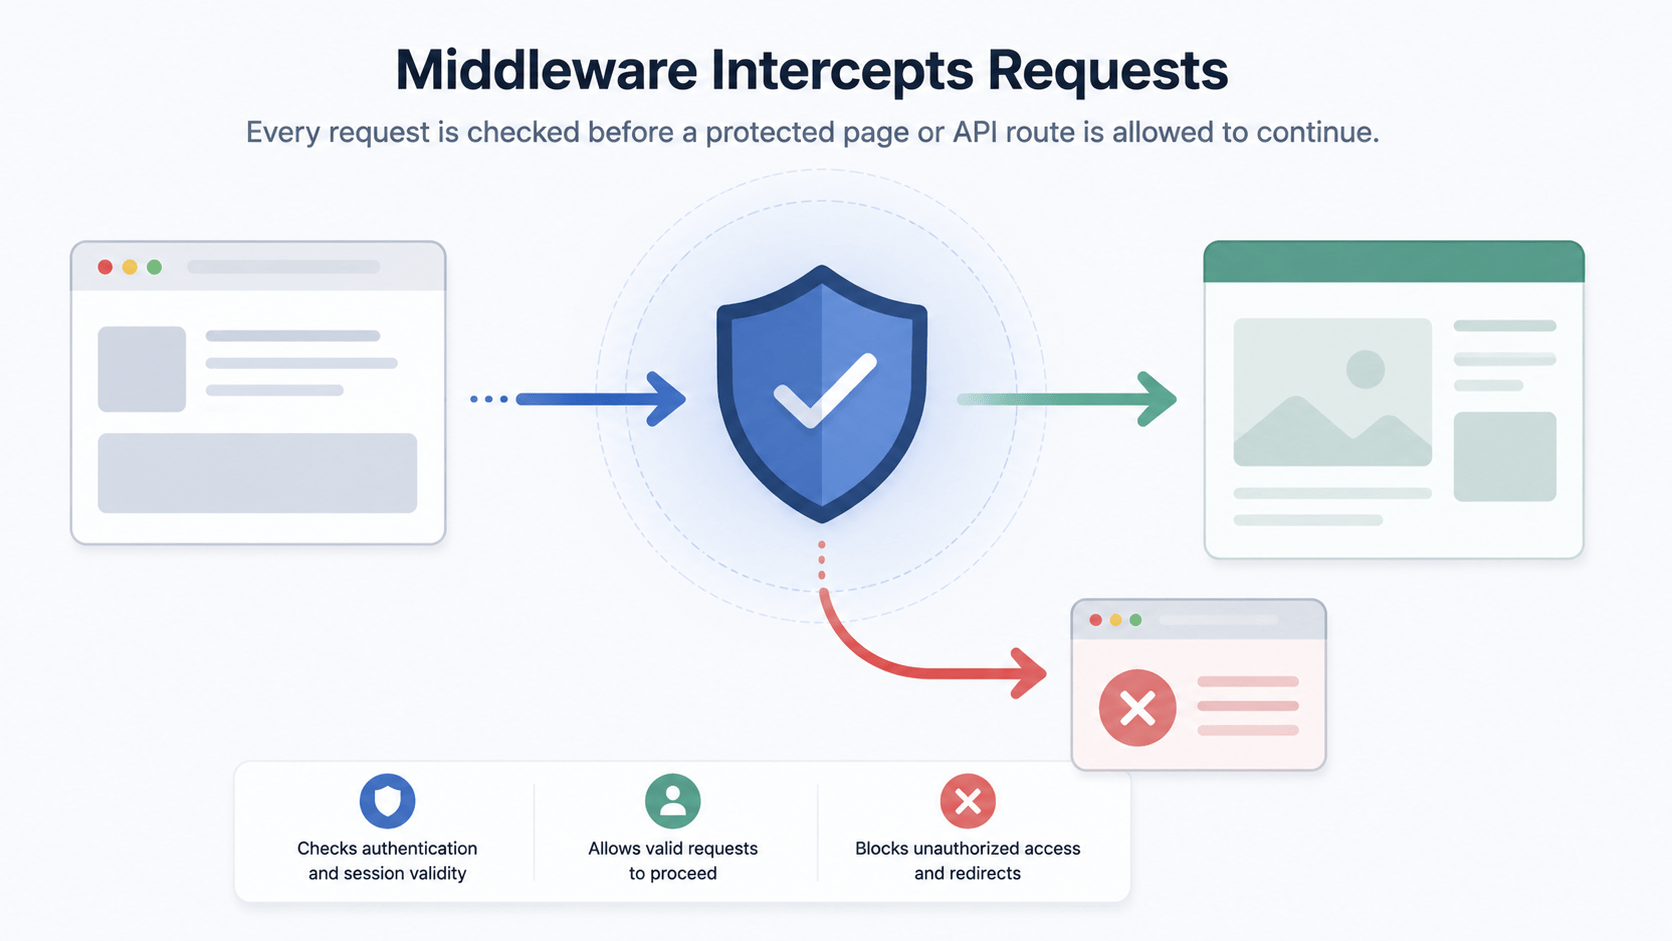
- Next.js Middleware intercepts incoming requests before they reach a page, letting you check the session token and redirect unauthorized users instantly, before any protected content renders.
Step 1: Install and Configure Auth.js
Start by installing Auth.js for Next.js:
bash
npm install next-auth@beta
Next, create a central auth.js file in your project root:
javascript
// auth.js
import NextAuth from "next-auth";
import GitHub from "next-auth/providers/github";

export const { handlers, auth, signIn, signOut } = NextAuth({
  providers: [
    GitHub({
      clientId: process.env.GITHUB_CLIENT_ID,
      clientSecret: process.env.GITHUB_CLIENT_SECRET,
    }),
  ],
  pages: {
    signIn: "/login", // Custom sign-in page path
  },
});
Add your GitHub OAuth credentials and a random AUTH_SECRET value to .env.local. Auth.js needs AUTH_SECRET to encrypt session cookies, so never commit this file to version control.
Step 2: Expose the Auth API Route
To expose the Next.js authentication endpoints (/api/auth/*) that Auth.js relies on, create a catch-all API route handler:
javascript
// app/api/auth/[...nextauth]/route.js
import { handlers } from "@/auth";
export const { GET, POST } = handlers;
This single file handles sign-in, callback, sign-out, and session requests for every configured provider, so you rarely need to touch it again after setup.
Step 3: Protect Routes at the Edge with Middleware
Instead of checking whether a user is logged in inside every single page component, Next.js lets you enforce Next.js authentication across entire route segments with one centralized middleware.js file.
Middleware runs on the edge before a request completes. That makes Next.js authentication checks nearly instant and prevents protected content from ever leaking into the initial HTML.
javascript
// middleware.js
import { auth } from "@/auth";

export default auth((req) => {
  const isLoggedIn = !!req.auth;
  const isOnDashboard = req.nextUrl.pathname.startsWith("/dashboard");

  if (isOnDashboard && !isLoggedIn) {
    // Redirect unauthenticated users to the login page
    return Response.redirect(new URL("/login", req.nextUrl));
  }
});

// Configure matcher to run middleware on specific paths
export const config = {
  matcher: ["/dashboard/:path*", "/admin/:path*"],
};
Step 4: Access User Sessions in Server and Client Components
Next.js Authentication in Server Components (Zero Client Overhead)
Because Auth.js works seamlessly with React Server Components, reading session data on the server is as simple as calling await auth().
javascript
// app/dashboard/page.js
import { auth } from "@/auth";
import { redirect } from "next/navigation";

export default async function DashboardPage() {
  const session = await auth();

  // Double-layer protection check directly inside the page
  if (!session) {
    redirect("/login");
  }

  return (
    <main style={{ padding: "20px" }}>
      <h1>Welcome back, {session.user.name}!</h1>
      <p>Logged in as: {session.user.email}</p>
      {session.user.image && (
        <img
          src={session.user.image}
          alt="User avatar for logged-in Next.js authentication session"
          width={50}
          style={{ borderRadius: "50%" }}
        />
      )}
    </main>
  );
}
Checking the session again inside the page, on top of Middleware, is a small bit of redundancy worth keeping. It protects you if the matcher pattern ever falls out of sync with your actual routes.
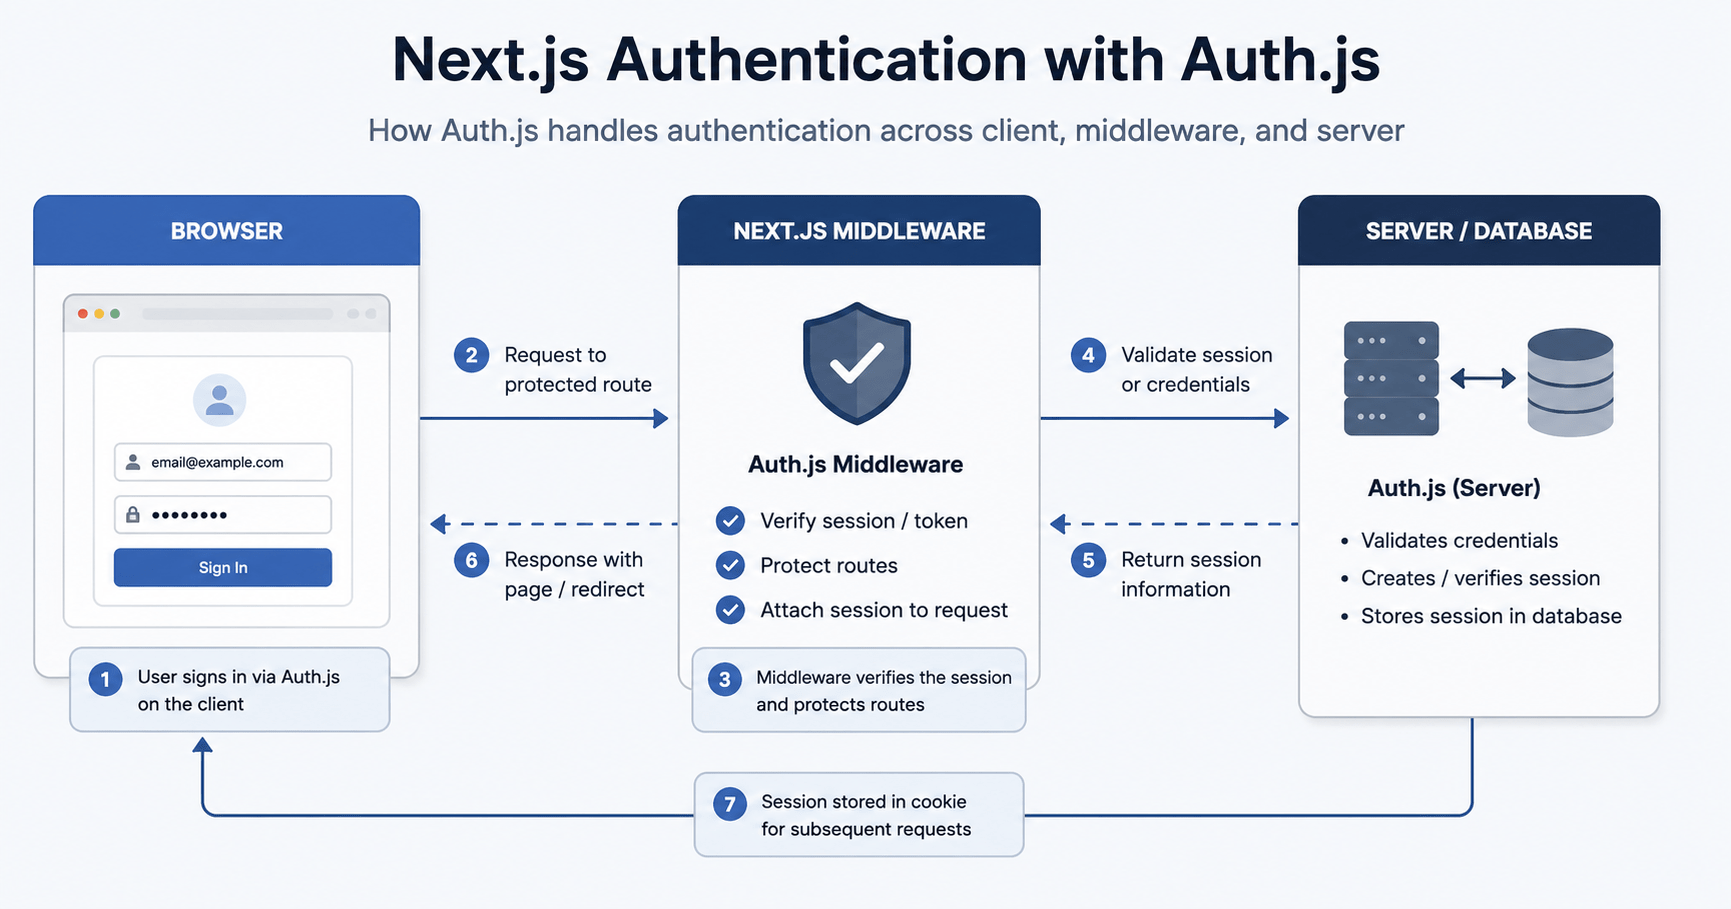
Triggering Login and Logout from Server Actions
For Next.js authentication flows that need explicit buttons, Auth.js exports clean signIn and signOut functions that wire up directly to Server Actions, so you don’t need any client-side JavaScript just to log a user in or out.
javascript
// app/components/AuthButtons.jsx
import { signIn, signOut } from "@/auth";

export function SignInButton() {
  return (
    <form
      action={async () => {
        "use server";
        await signIn("github");
      }}
    >
      <button type="submit">Sign in with GitHub</button>
    </form>
  );
}

export function SignOutButton() {
  return (
    <form
      action={async () => {
        "use server";
        await signOut();
      }}
    >
      <button type="submit">Log Out</button>
    </form>
  );
}
Step 5: Handle Common Setup Errors
A few errors show up often enough during Next.js authentication setup that they’re worth calling out directly:
- “MissingSecret” error – Usually means
AUTH_SECRETisn’t set in.env.local, or your dev server started before the file was saved. Restart the server after adding it. - OAuth callback URL mismatch – Your GitHub OAuth App’s callback URL must exactly match
http://localhost:3000/api/auth/callback/githubin development, protocol and port included. - Session is
nullon the client – Client Components need aSessionProviderwrapper if you’re reading session state with a hook instead ofawait auth()on the server. Prefer the server-side approach shown above where you can.
Also Read: New to the App Router itself? Our ReactJS and Next.js project setup guide walks through the foundation this Next.js authentication setup builds on.
Summary Checklist for Auth.js
Next.js Auth Setup Files
The four files that power a complete authentication system
| Task | File Path | Purpose |
|---|---|---|
|
01
Auth configuration
|
auth.js | Configures OAuth providers, JWT options, and custom pages |
|
02
API route handler
|
app/api/auth/[…nextauth]/route.js | Exposes standard HTTP auth endpoints |
|
03
Edge protection
|
middleware.js | Protects route patterns globally before the page renders |
|
04
Session retrieval
|
await auth() inside page.js | Fetches active user data inside Server Components |
Frequently Asked Questions
Is Auth.js free to use in production?
Yes. Auth.js is open source and free under the ISC license. You pay nothing to Auth.js itself; any cost comes from your own database or hosting if you choose database sessions over JWT.
Does Next.js authentication with Auth.js work with the Pages Router?
Yes, though this guide focuses on the App Router. The core configuration in auth.js stays the same; only the API route and middleware syntax differ slightly for the Pages Router.
Can I use email and password login instead of OAuth?
Yes. For Next.js authentication without a third-party provider, Auth.js supports a Credentials provider for username-and-password login. You’re responsible for hashing passwords and validating credentials yourself, since Auth.js doesn’t manage a user database for you.
Why use Middleware instead of checking auth on every page?
Middleware centralizes Next.js authentication logic in one file instead of repeating the same check across dozens of pages, and it runs at the edge, so unauthorized users get redirected before any protected markup is ever generated.
Do I need a database for Next.js authentication?
Not necessarily. JWT sessions store everything in an encrypted cookie, so you can skip a database entirely for small projects. You’ll need one only if you want database sessions, instant token revocation, or to persist user data beyond the session.
Conclusion
Auth.js makes Next.js authentication fast, flexible, and genuinely secure without forcing you to build password hashing or CSRF handling by hand. By combining OAuth providers, edge Middleware for route protection, and Server Components for session checks, you get a setup that’s both simpler to maintain and safer by default.
Start with the GitHub provider above, get one protected route working end to end, then add more providers or a Credentials flow once the core pattern clicks.