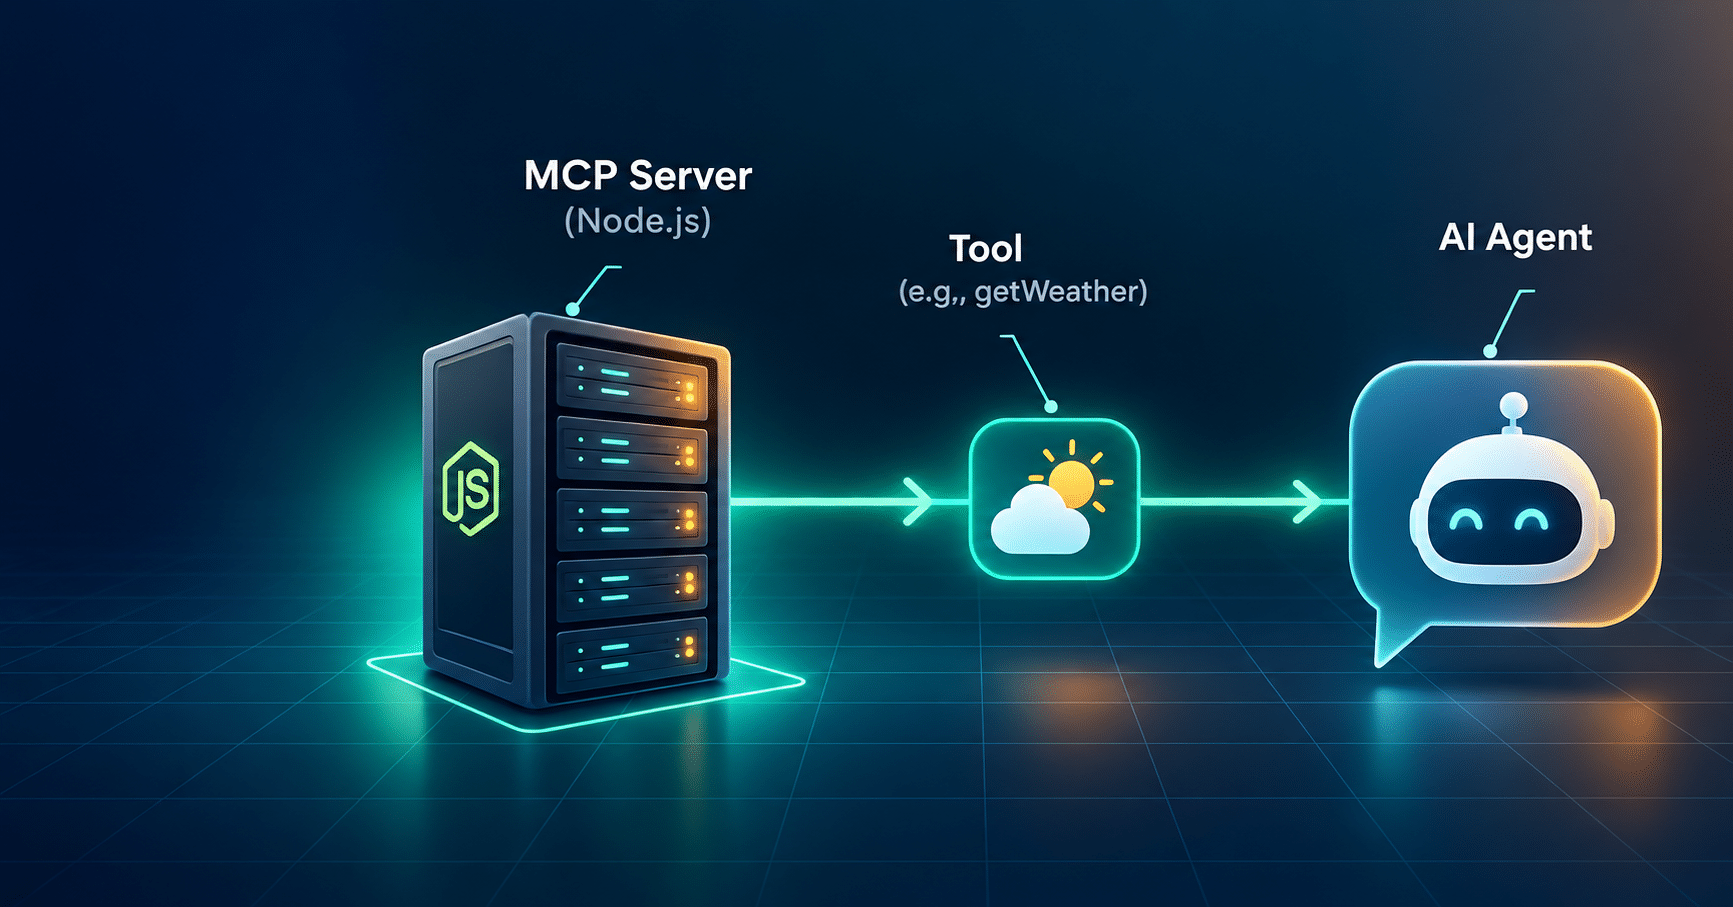

An MCP server lets your AI model call real tools, and in this guide you will build one in Node.js from scratch. By the end, you will have a working get_weather tool that any MCP-compatible agent can discover and run.
In Part 2 of this series, we ran open-source models locally with Ollama and connected to them through the Vercel AI SDK. That gave us a backend that can process chat requests and stream responses.
Also Read: Vercel AI SDK: Run AI Models Free, Cloud or Local (Part 2)
But there is a glaring problem: our AI is isolated. It can write text, but it doesn’t know what time it is, it can’t check a user’s balance in our database, and it can’t trigger a refund API.
Developers used to fix this with custom “glue code” for every LLM, defining functions the model could call (often called Function Calling or Tools). That approach is brittle and hard to scale. The Model Context Protocol solves exactly this problem.
What Is the Model Context Protocol (MCP)?
Anthropic introduced the Model Context Protocol as an open standard. Think of it as a USB port for AI models. It gives AI applications (the Host) a standard way to connect to external data sources and tools (the Servers).
Instead of teaching a model how to talk to your specific database, you build an MCP server. Any MCP-compatible agent can then connect to it, discover the tools you expose, and run them.
How an MCP Server Fits Into the MCP Architecture
MCP has three parts, and it helps to know which one you are building.
Host
The application running the AI model, such as Claude Desktop, Cursor, or your own React app built with the Vercel AI SDK.
Client
The component inside the Host that opens the connection to a server.
Server
Your backend service. In this tutorial it is a Node.js app that exposes tools, resources, and prompts.
Why Node.js Developers Should Learn to Build an MCP Server
If you build full-stack apps, MCP is worth learning now because the same server works across many AI clients. Here is what you get:
- Standardization: Write a tool once and use it with any compliant LLM or agent.
- Control: You decide which data the AI can read and which actions it can take. Your database credentials stay on your server and never reach the model.
- Separation of concerns: Your business logic stays apart from the AI layer.
Also Read: The Full-Stack AI Developer Roadmap: From REST APIs to MCP Servers in 2026
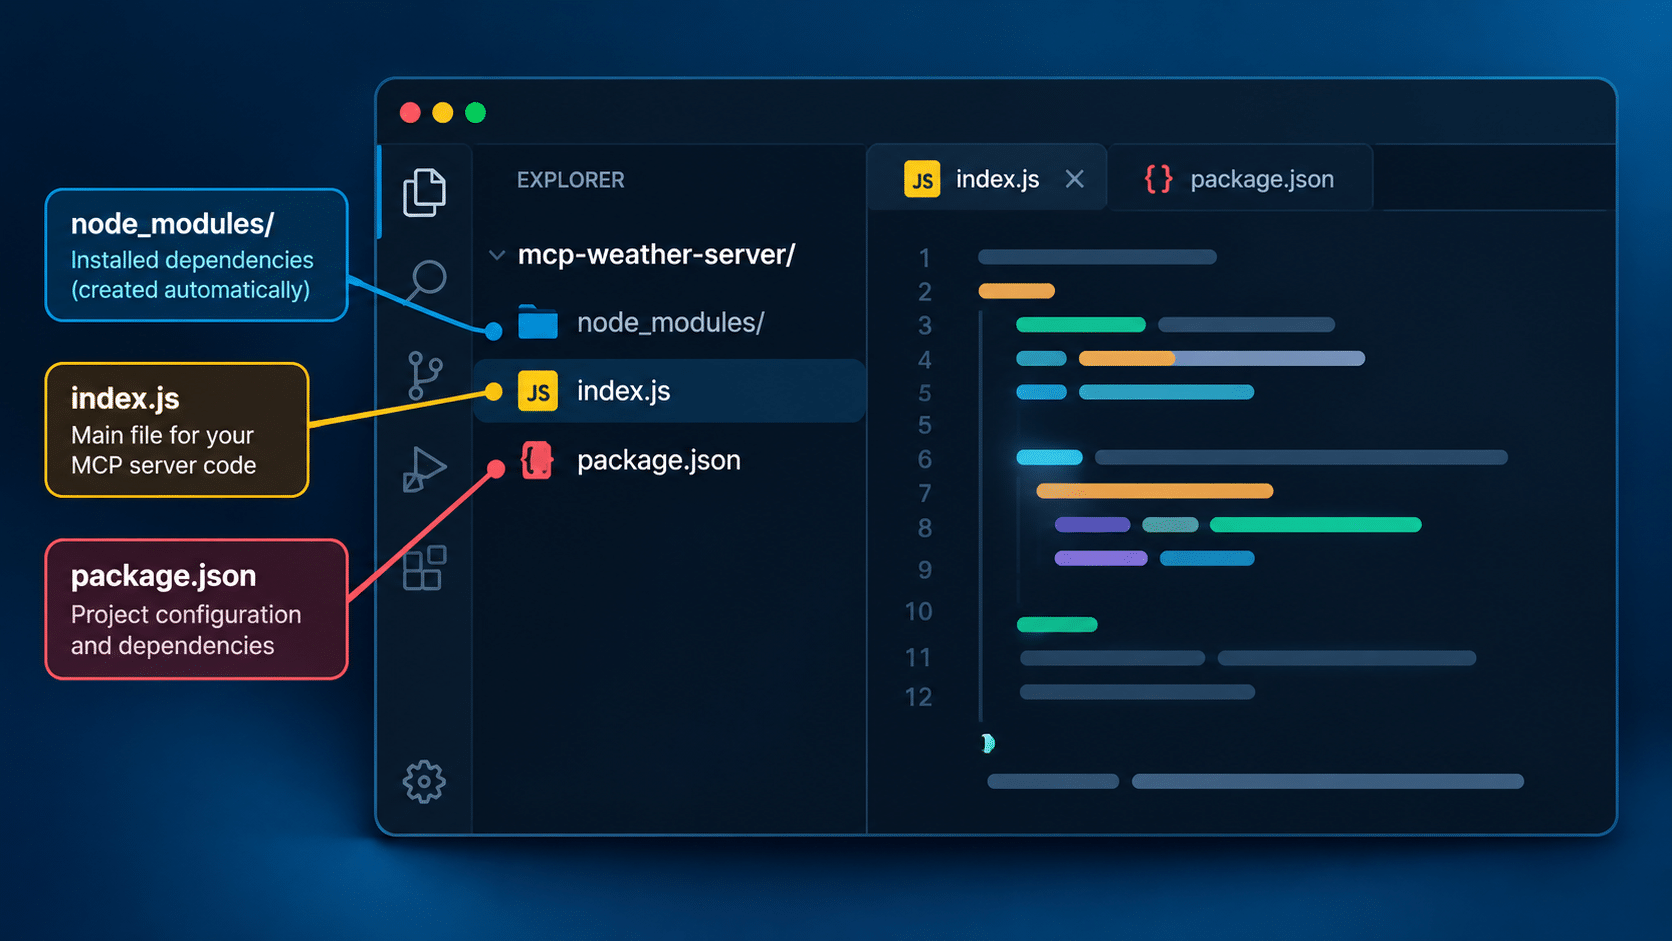
Step 1: Set Up Your Node.js MCP Server Project
Let’s build a small server that gives the AI a tool it badly needs: checking the weather. You need Node.js 18 or newer.
Create a project and install the official SDK. We pin version 1 of the SDK and zod 3 so the code below matches exactly.
bash
mkdir mcp-weather-server
cd mcp-weather-server
npm init -y
npm pkg set type=module
npm install @modelcontextprotocol/sdk@1 zod@3
The type=module line lets you use import statements. We use zod to validate tool arguments, which MCP relies on so the AI passes the right inputs.
Step 2: Initialize the Server
Create an index.js file. First, import the SDK and create the server. For transport, we use stdio (standard input/output). It is ideal for local agents and for apps like Claude Desktop.
javascript
import { McpServer } from "@modelcontextprotocol/sdk/server/mcp.js";
import { StdioServerTransport } from "@modelcontextprotocol/sdk/server/stdio.js";
import { z } from "zod";

const server = new McpServer({
  name: "weather-service",
  version: "1.0.0",
});
Show Image
Step 3: Define a Tool
Tools are the core of any MCP server. A tool is an action the AI can take.
Let’s add a get_weather tool. We give it a name, a clear description (the LLM reads this to decide when to use it), and its arguments described with zod.
javascript
server.registerTool(
  "get_weather",
  {
    description: "Get the current weather for a specific location",
    inputSchema: {
      city: z.string().describe("The city name, e.g. 'New York' or 'London'"),
      unit: z
        .enum(["celsius", "fahrenheit"])
        .default("celsius")
        .describe("The temperature unit"),
    },
  },
  async ({ city, unit }) => {
    // Log to stderr, because stdout is reserved for MCP messages
    console.error(`[Server Logic] Fetching weather for ${city}...`);

    // Mock data for this demo
    let temp = 22;
    if (city.toLowerCase() === "london") temp = 15;
    if (city.toLowerCase() === "dubai") temp = 35;
    if (unit === "fahrenheit") temp = (temp * 9) / 5 + 32;

    // MCP tools must return content in this format
    return {
      content: [
        { type: "text", text: `The weather in ${city} is currently ${temp} degrees ${unit}.` },
      ],
    };
  }
);
In a real app, swap the mock for a live API. Open-Meteo is a free weather API that needs no key, so it is an easy place to start.
Why Descriptions Matter for Your MCP Server
Look at the .describe() calls and the tool description. The AI reads them to work out how to use your tool. Vague descriptions make the model guess, and guessed arguments lead to failed tool calls. Write them like you are explaining the tool to a new teammate.
Note that server.tool() also exists in older tutorials. The SDK docs now recommend the register* methods for new code, which is why we use registerTool here.
Step 4: Start the Server
Now connect the server to a transport so it can listen for requests.
javascript
async function main() {
  const transport = new StdioServerTransport();
  await server.connect(transport);
  console.error("Weather MCP server running on stdio");
}

main().catch((error) => {
  console.error("Fatal error:", error);
  process.exit(1);
});
Always log with console.error. With stdio, anything written to stdout is treated as protocol traffic, and a stray console.log will break the connection.
Step 5: Test Your MCP Server
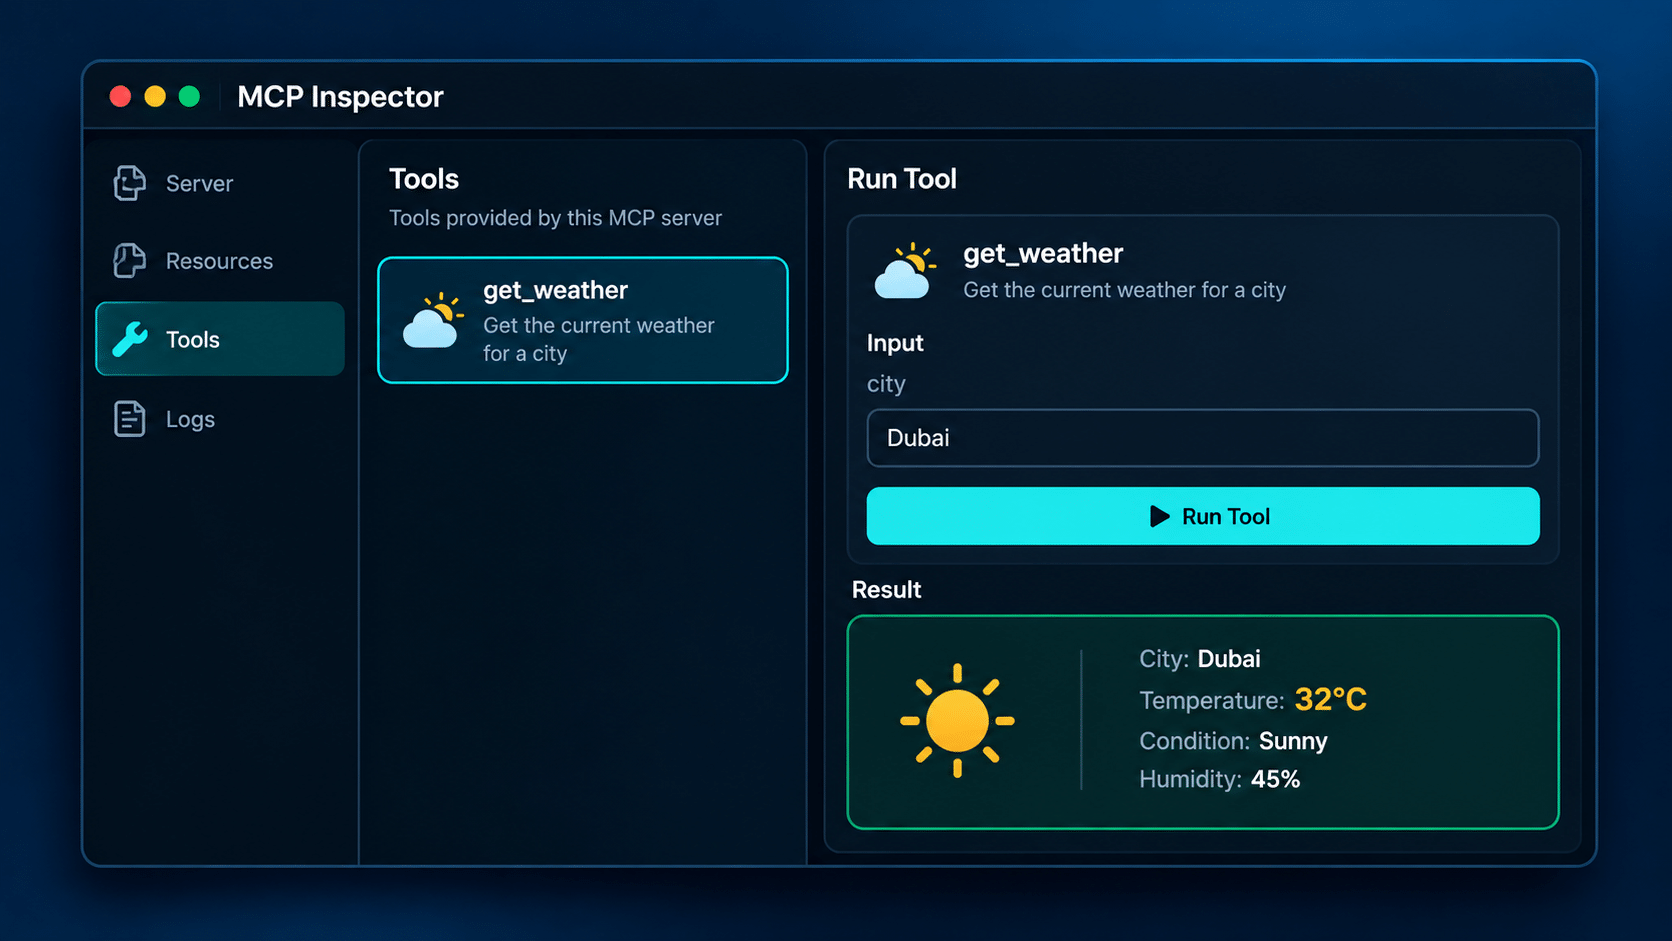
The fastest way to test is the official MCP Inspector, a web-based tool:
bash
npx @modelcontextprotocol/inspector node index.js
It opens a browser UI that lists your get_weather tool. Pick the tool, enter a city like Dubai, and run it. The Inspector calls your server directly and shows the result. It does not include an AI model, so you are testing your server, not a chat.
To try it with a real model, add the server to a host like Claude Desktop. Open its MCP config file and add an entry that points to your script:
json
{
  "mcpServers": {
    "weather": {
      "command": "node",
      "args": ["/absolute/path/to/mcp-weather-server/index.js"]
    }
  }
}
Restart the app, then ask, “What is the weather in Dubai?” The model should find your tool, call it, and answer with the result.
Show Image
Taking Your MCP Server Online with HTTP
Stdio is great for local agents. But as a full-stack developer, you will often need a React frontend to talk to a remote MCP server.
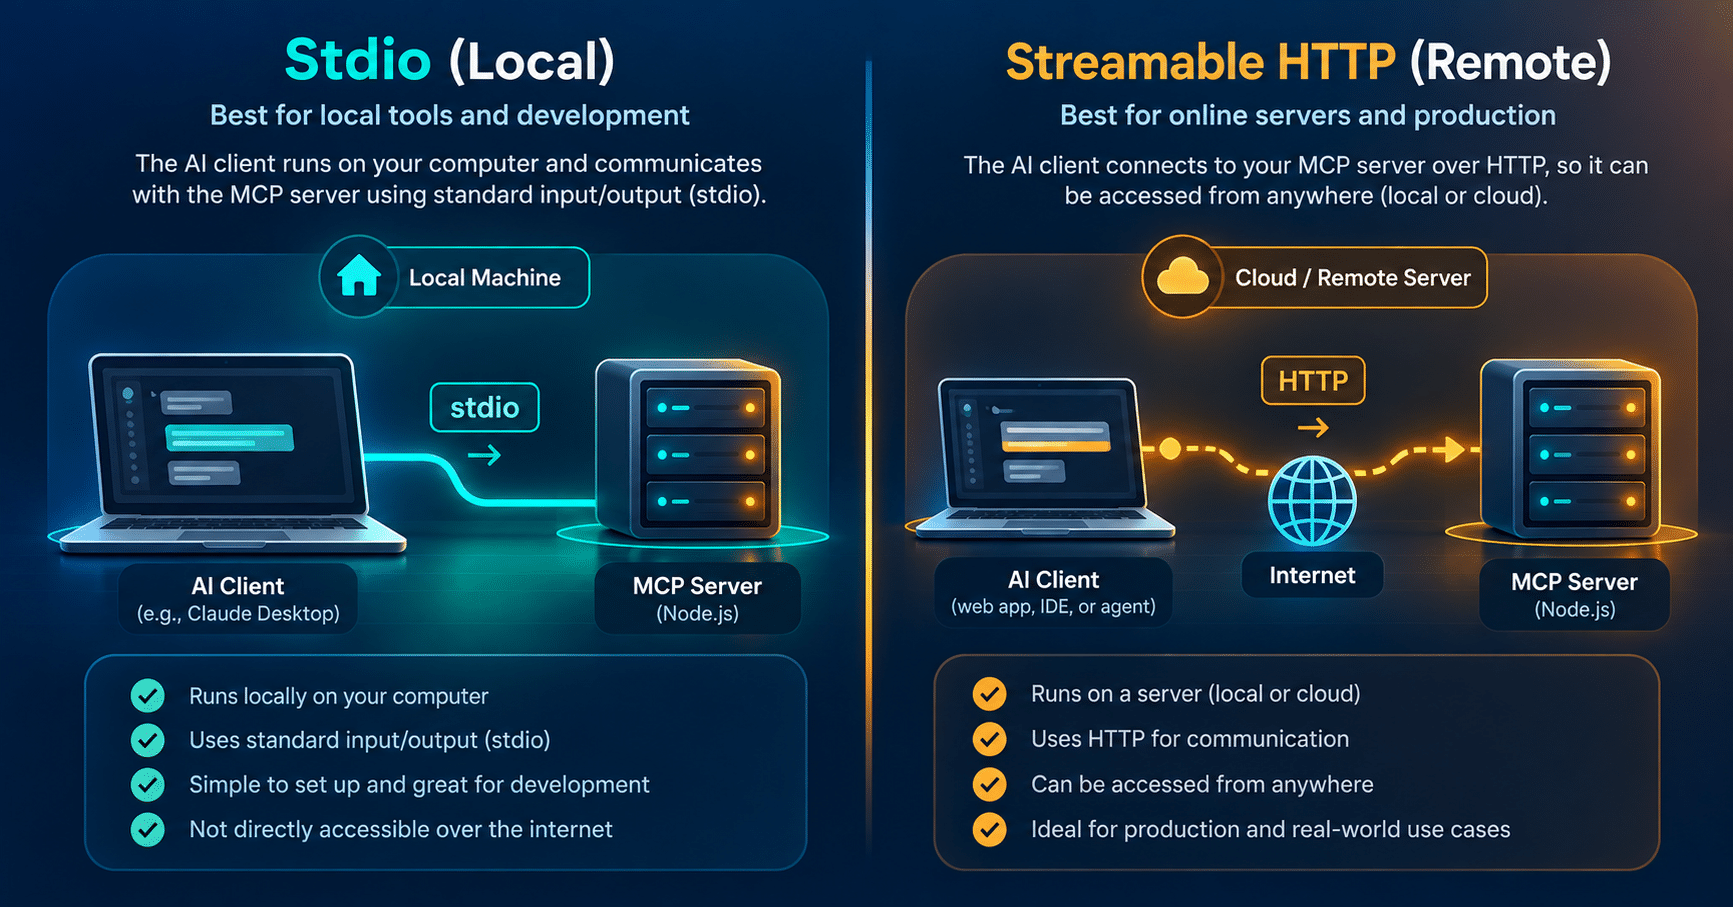
For that, MCP uses Streamable HTTP. It handles requests over HTTP POST and can stream updates back with Server-Sent Events (SSE) when needed. You would add a web framework like Express and use the SDK’s Streamable HTTP transport instead of StdioServerTransport.
One warning if you have read older tutorials: the standalone HTTP+SSE transport is deprecated. The MCP specification changelog says to migrate to Streamable HTTP, and the TypeScript SDK docs recommend it for remote servers. Build new servers on Streamable HTTP.
FAQ: Building an MCP Server in Node.js
What is an MCP server?
An MCP server is a program that exposes tools, data, and prompts to AI applications through the Model Context Protocol. The AI connects, discovers what the server offers, and calls it when needed.
Do I need Claude to use an MCP server?
No. MCP is an open standard, so any compatible host can connect. Claude Desktop and Cursor are two examples, and you can also build your own client.
Should I use stdio or HTTP?
Use stdio for local tools that run on your own machine. Use Streamable HTTP when the server must be reached over a network, such as from a web app.
Why is my tool never called by the AI?
Usually the description is too vague. Rewrite the tool and argument descriptions so they say what the tool does and when to use it.
Can an MCP server replace my REST API?
No. They work as layers. Your REST API serves apps and developers, while an MCP server wraps the same logic for AI agents.
Conclusion
An MCP server turns your business logic into something any compliant AI agent can use, without rewriting integration code for each model. You built one in five steps: set up the project, initialize the server, define a tool, start it, and test it.
Start by swapping the mock weather data for a real API, then add a second tool. In Part 4, we will connect a React frontend to a Node.js MCP backend over HTTP and build the UI that shows when an AI is “thinking” and “using tools.”