How to Speed up windows using a USB drive as virtual memory?
ReadyBoost is the feature that speeds up your window by storing application files and data as a cache in your USB drive as virtual memory. This disk caching is beneficial in case the system is running a slow hard drive. ReadyBoost works with USB drives and SD cards.
But, it may not be able to deliver considerable performance in the case of newer hardware. So, if you’re stuck with older hardware, you can speed up Windows using ReadyBoost and a USB drive.
- ReadyBoost was intended to supplement RAM in the case of slow hard drives. Almost a decade ago, when the feature was launched, the flash storage-based USB drives could offer a faster alternative when transferring data to and from the RAM.
[su_note note_color=”#f5f5d4″ radius=”6″]| Also Read | Install Ubuntu in Windows 10[/su_note]
Now a question arises how the ReadyBoost works?
ReadyBoost is a feature that allows the system to store required data in an external media for some time. The real driving force behind it is SuperFetch – a disk cache management system in Windows that speeds up your system. It can make slow systems fast, not like magic but up to some extent. Even a small boost can make your windows system smoother to run and start.
SuperFetch runs some algorithms to analyze your habits and automatically loads the relevant data to the main memory RAM. For instance, if Mozilla or Xampp is the first application you use when you start your PC, SuperFetch will load Mozilla and Xampp files on the RAM and reduce the launch time.
SuperFetch creates a temporary cache on the main memory itself.
[su_note note_color=”#f5f5d4″ radius=”6″]| Also Read | How to Install PHP[/su_note]
Steps to be followed to set up your USB drive and increase the speed of the system

1. Connect the USB drive to your Windows 10 PC. Make sure its empty and any important information on the USB should be safe and backed up somewhere else as it will format the space as well.
2. Go to This Pc or My Computer by clicking on Desktop Icon or file explorer
3. Now right-click on your USB drive to open the context menu and select Properties.
4. Under the ReadyBoost tab, you can allocate space for the ReadyBoost feature or use the complete USB drive.
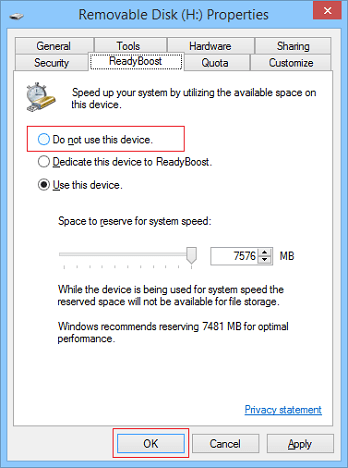
Select Dedicate this device to ReadyBoost if you won’t be using the USB drive for any other purpose. Otherwise, select Use this device radio button and use the slider to reserve space for the feature. You can select as much space on the drive. (But the selected space will be reserved for the time until you remove this ReadyBoost feature)
Click OK to finish. Windows 10 will take some time to configure the USB drive.
Just select enough space to hold the programs you might run. For an Idea, 4GB is the ideal space, but if you have more available then you can set up 8GB as well. There is no ideal space, but you can experiment with small space first and then can later expand to get more performance.
So, this way you can speed up Windows using ReadyBoost if you’re low on resources. You might observe some benefits of the feature but they largely depend on people’s usage habits and may differ from machine to machine.
Learn everything with love. Keep visiting Tekraze for more updates coming. Don’t forget to share as sharing is caring. Have a nice day.

